Changing chord shapes (with your fretting hand) is one of the trickier things about learning guitar, especially at first. Every chord shape is new, it’s hard to remember where to place your fingers, and making the chord changes quickly seems altogether impossible.
But fear not: with time and practice, this does get way easier. As you practice, you’ll develop muscle memory… and your fingers will start acting on their own, as if they know where to go without any conscious thought.
Here’s some general tips to get comfortable with tricky chord changes, whether you’re learning your first ever guitar chords or you’re trying to add some advanced chord shapes to your arsenal.
Whenever you’re learning a new chord, spend some time only focusing on that individual chord. Get your fingers into the correct position to play the new chord. Take as much time as you need — there’s no need to worry about speed yet.
Once your fingers are in place, pluck each string within the chord shape individually. Going from thickest to thinnest is what I suggest. Listen to each string that you pluck. Is it ringing cleanly? Or is it muted/muffled? Adjust your hand and/or fingers as necessary until each string makes a clear & clean sound.
After your fretting hand is properly in place, take your hand off the fretboard. Relax for a moment. Then repeat from the beginning.
This last part is important! Don’t just put your hand into the chord shape once and hold it there for a long time. Putting your fingers into position, taking them away, and then finding that position again is where a lot of the useful practice happens.
Changing between multiple chords is something we’ll get to… but first, be able to play a chord individually. The faster you can move your hand into position (from a relaxed off-the-fretboard resting point), the easier time you’ll have changing between multiple chords.
When practicing chord changes, do not simply choose two random chords and practice switching between them. Instead, focus on chord pairings you’ll encounter in actual songs.
An easy place to start is with a song you’re learning (or would like to learn). Identify the chord changes giving you the most trouble and practice those specifically. This will help with the song in question, as well as other songs using those same chords.
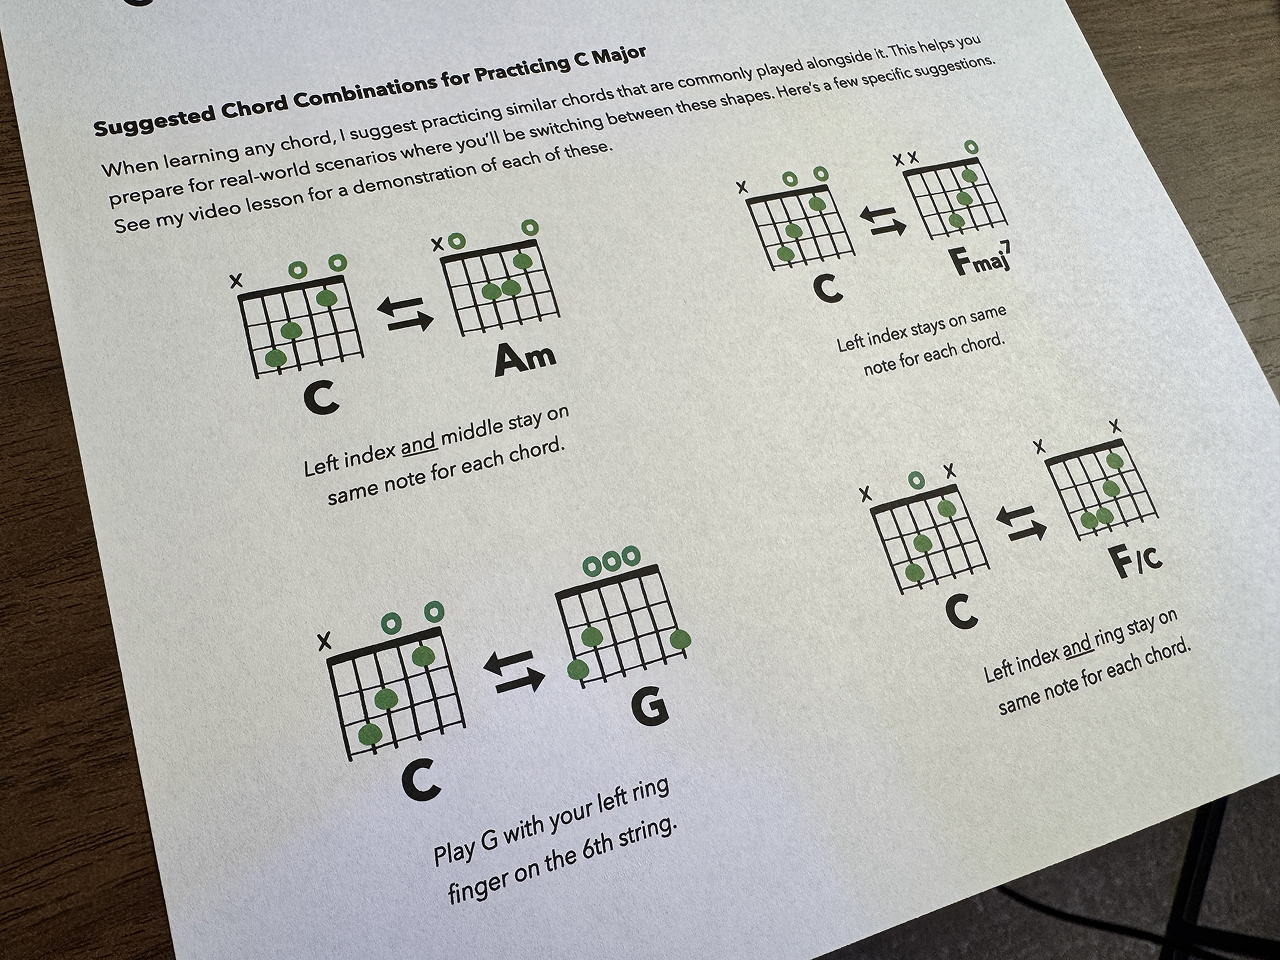
Within this course, I also show Suggested Chord Combinations for each of the must-know chords I teach. I present this in video and PDF format. An example of which is shown below, from my PDF for the C major chord:
If you want to go deeper in understanding which chords are often used together (and why), the following lessons should help considerably:
Another great way to truly learn any chord is to practice going in & out of its common modifications. This refers to actual ways any chord may be tweaked (by adding or removing a finger) in actual songs. Practicing these adjustments is usually easy to do, and helps prepare you for songs you’ll learn one day.
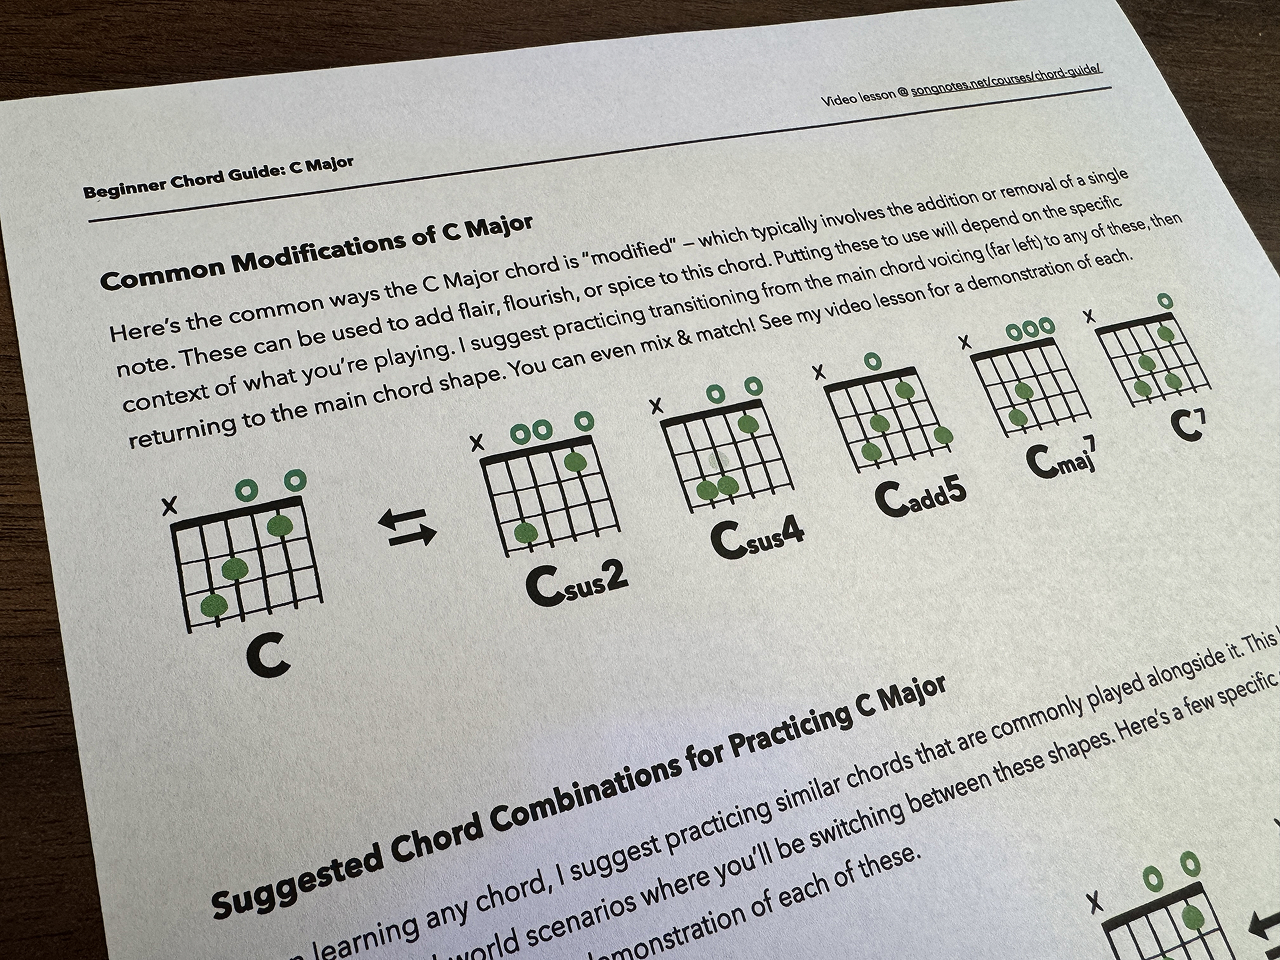
The image above shows an example of these modifications (for the C major chord) as presented in my PDF guide for that chord. I also walk through these modifications in separate videos, which you can find on the lesson page for each must-know chord.
For each modification, begin by positioning your fingers and then playing the “normal” chord shape cleanly. Then, make the necessary finger adjustments to play one of the modifications. Play all the strings in the chord cleanly. Return to the original chord shape, and repeat the entire process with the same (or a different) modification.
When you’re first learning a chord, don’t feel like all of your fingers need to magically land in the correct frets at the exact same time. In most cases, this is not what happens.
Instead, you’ll probably find that one or two fingers naturally have an easier time finding their target. Let those fingers lead the way. Once they’re in position, they can act as anchors that help the rest of your fingers find where they need to go.
As you practice a specific chord, pay attention to the order your fingers naturally want to move. For the C major chord, for instance, I find that placing my left ring & middle fingers (on the 5th and 4th strings) first helps my hand feel securely in position. From there, it feels incredibly natural for my left index finger to land on the 2nd string without me thinking about it.
There’s no need to rush this process. With enough slow, accurate repetition, these individual finger movements will gradually become quicker and more automatic. Eventually, what once felt like several separate movements will begin to feel like one.
A trick that’s especially helpful when a chord change feels difficult: you don’t always need to fret the entire chord before you start playing any of its strings.
Instead, play the bass note of the new chord first. While that note is ringing, use the extra moment to move your remaining fingers into position… and then strum the full chord. For example, if you were practicing the transition between D and G, you could practice it like this:
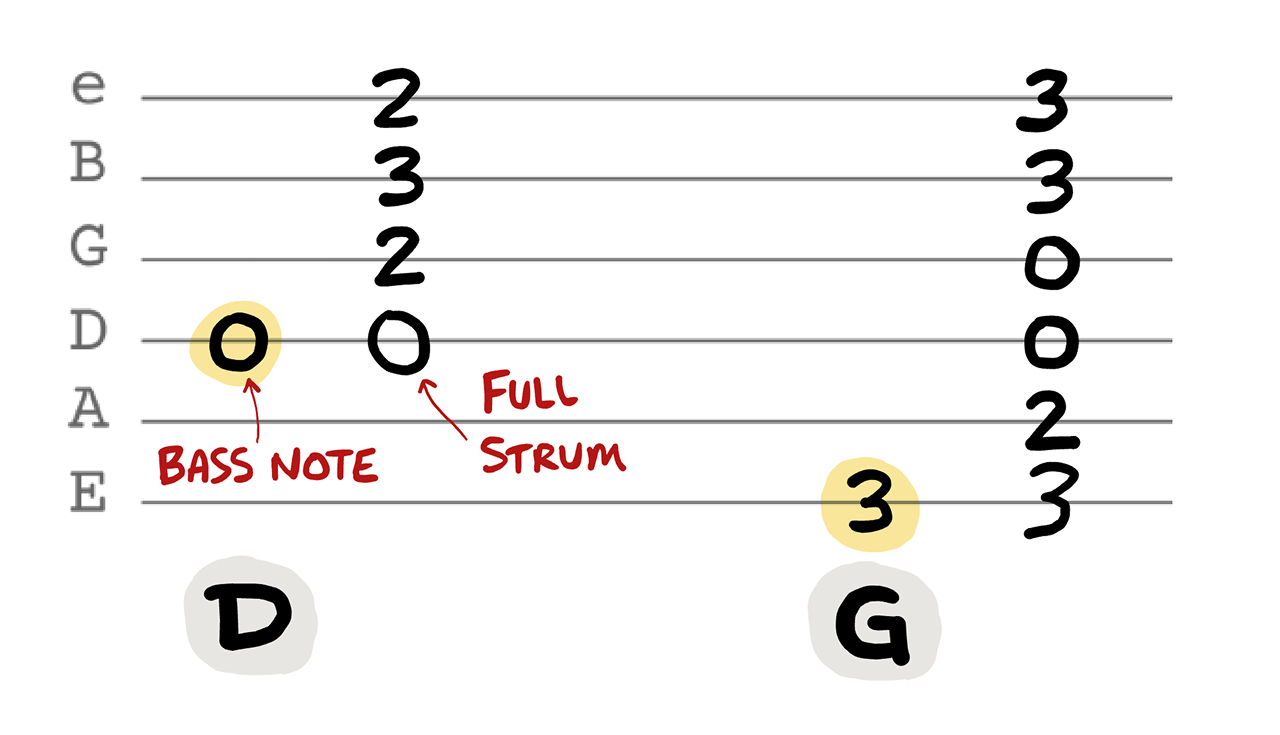
This buys your fretting hand a little extra time… and is a tip you’ll use in plenty of actual songs. This also drills home the importance of quickly targeting (and playing) the bass note of any given chord, which is an essential aspect of bass note strumming.
A great way to practice chord transitions is to keep track of your progress. This gives you a quantifiable, measurable score that helps reveal the rate of improvement.
The idea is to set a timer for 60 seconds, and during that time keep track of how many times you can cleanly complete a certain chord-based challenge. For example:
Learning One Chord:
Transitioning Between Two Chords:
Don’t race! Go as quickly as you comfortably can, while still putting your fingers where they’re supposed to go. You’re only cheating yourself if you lie about your score.
After writing things down, try the same exercise again… whether that’s immediately, or later in the day, or the next time you practice. With time, you’ll likely notice that your fingers start to remember where they’re supposed to go… and your number of chord changes will gradually increase.
If you find it difficult to maintain a steady strumming groove while changing chords, you’re not alone. Fortunately, there’s a non-obvious trick that most guitarists use to make this easier.
In lesson #601 I explain the “empty strum” trick. The idea is you continue your right hand’s steady strumming motion, but start your left-hand chord change early. This means you may be strumming open (or “empty”) strings while repositioning your left hand… but that’s 100% okay! See my video lesson below for more context:
If some of the strings in your chords sound muted or muffled when you don’t want them to, don’t get discouraged. This is incredibly common when learning new chord shapes, and usually comes down to the finer points of finger placement and positioning.
In lesson #543, I share a bunch of tips that can help: arching your fingers, fretting with your fingertips, finding the best position within each fret, avoiding excessive pressure, and more. I also demonstrate a few ways to practice troublesome chord shapes one string at a time, helping you develop a better sense of “feel” with your fretting hand.
There’s likely no immediate fix for this — but with consistent practice, your fingers will develop the muscle memory needed to find their proper positions more naturally. See my video lesson below for all my tips:
If you find yourself frustrated or overwhelmed at the prospect of learning new chords (or switching between them), don’t give up! Understand that the very start of the journey is the most difficult part.
I also found, when starting on guitar, that each new chord I learned made all future chords a little bit easier to get the hang of. Your finger strength and flexibility will increase, as well your ability to quickly reposition your fingers across the frets.
Lastly, there is definitely a limit to the number of chords you’ll ever need. Beyond the 8 must-know open chords, there’s only a few additional shapes you’ll need for barre chords. With these combined, you’ll be set for 90%+ of chords you’ll ever encounter in popular songs.
 Premium
 VIP
VIP Beta Tester