The 12 Bar Blues

Instructional PDF 5 pages

Follow along with the print-friendly PDF! It includes all of my notes for this lesson, allowing you to follow along at your own pace. You're free to download, print, and share the PDF across your devices.

Thanks for being a Premium member of Song Notes! Your support makes these lessons possible.

Download PDF

Follow along with the print-friendly PDF!

It includes all of my notes for this lesson, allowing you to follow along at your own pace. You're free to download, print, and share the PDF across your devices.

To download the PDF, upgrade to premium or log in.

Lesson Discussion

Jump in the conversation with other members of the Song Notes community! Post a comment about this lesson, ask a question, or even upload a video of your progress. All skill levels welcome!

View Comments

Jump in the conversation with other members of the Song Notes community! Post a comment about this lesson, ask a question, or even upload a video of your progress. All skill levels welcome!

To access the community forum, upgrade to premium or log in.

Strum-Along Practice Tracks

Here’s a few videos which play through a 12 bar blues, with the progression and chord shapes on screen so you can follow along. These aren’t as much meant to be lead guitar jam tracks. Rather, use them as simple strum-alongs, to help you get a feel for the 12 measure sequence. In each video below, I strum once per measure – always on the one count.

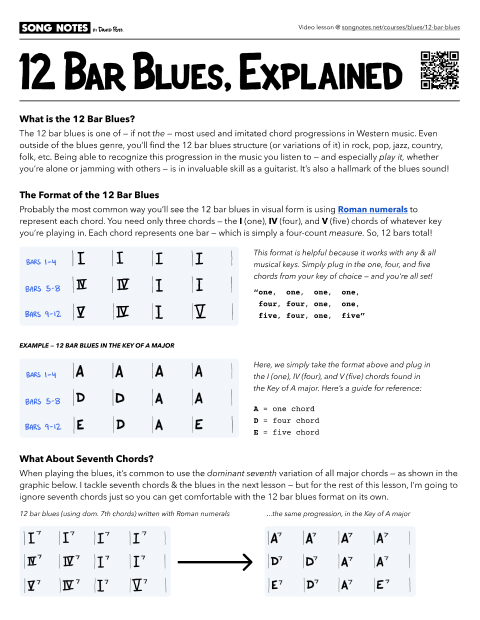
As I note in my main video lesson, I’m using regular major chords for both videos below — and not yet embracing dominant 7th chords. Those will come in the next lesson, so stay tuned! I just want to demonstrate that even without seventh chords, we can still play a 12 bar blues progression.

Key of E

Only available to Premium members

Upgrade to Premium

Key of A

Only available to Premium members

Upgrade to Premium

Practice Tracks with the “Quick Change”

In my main video lesson, I describe how you’ll sometimes switch to the IV (four) chord for the second measure, and then switch back to the I (one) for the third and fourth bars. This is called a quick change. If you’d like some practice tracks with this baked into the progression, you’re in luck! See below.

These follow the same visual format as the practice tracks above, with this added tweak to the progression. I’ll also stay on the I (one) chord in the final measure, which goes an extra step to differentiate things.

Key of E

Only available to Premium members

Upgrade to Premium

Key of A

Only available to Premium members

Upgrade to Premium

Next Lesson: Blues and 7th Chords →