Two-finger acoustic blues in Drop-D Tuning
Lesson #163 • Jul 24, 2018
Video Overview
Instructional PDF 3 pages
Editor’s notes
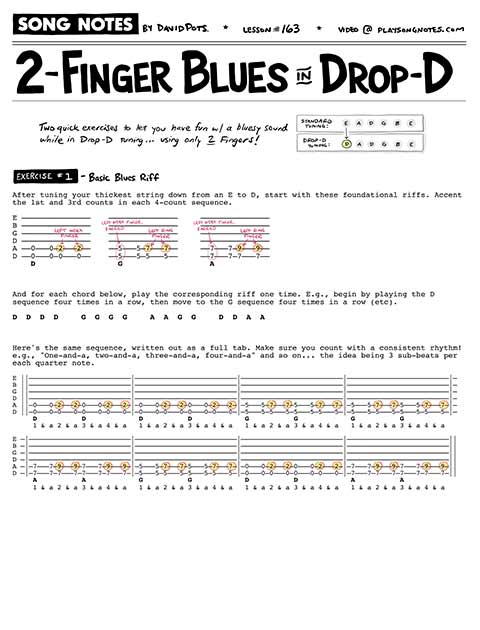
In this lesson I’ll show you a warm-up exercise built around simple blues riffs in drop-D tuning. This uses only 2 strings – and is easier to play than its standard tuning counterpart. If your guitar is regularly in drop-d, this is a great little exercise to pick up and play to get the blood flowing.
Simple blues riff
After tuning your thickest string down from an E to D, start with these foundational riffs. Accent the 1st and 3rd counts in each 4-count sequence.
E ––––––––––––––– ––––––––––––––– –––––––––––––––
B ––––––––––––––– ––––––––––––––– –––––––––––––––
G ––––––––––––––– ––––––––––––––– –––––––––––––––
D ––––––––––––––– ––––––––––––––– –––––––––––––––
A ––0–––0–2–––2–– ––5–––5–7–––7–– ––7–––7–9–––9––
D ––0–––0–0–––0–– ––5–––5–5–––5–– ––7–––7–7–––7––
D G A
And for each chord below, play the corresponding riff one time. E.g., begin by playing the D sequence four times in a row, then move to the G sequence four times in a row (etc).
D D D D G G G G A A G G D D A A
Here’s the same sequence, written out as a full tab. Make sure you count with a consistent rhythm! e.g., “One-and-a, two-and-a, three-and-a, four-and-a” and so on… the idea being 3 sub-beats per each quarter note.
E ||–––––––––––––––––––––––––|–––––––––––––––––––––––––|–––––––––––––––––––––––––|–––––––––––––––––––––––––|–
B ||–––––––––––––––––––––––––|–––––––––––––––––––––––––|–––––––––––––––––––––––––|–––––––––––––––––––––––––|–
G ||–––––––––––––––––––––––––|–––––––––––––––––––––––––|–––––––––––––––––––––––––|–––––––––––––––––––––––––|–
D ||–––––––––––––––––––––––––|–––––––––––––––––––––––––|–––––––––––––––––––––––––|–––––––––––––––––––––––––|–
A ||–0–––0–2–––2–0–––0–2–––2–|–0–––0–2–––2–0–––0–2–––2–|–5–––5–7–––7–5–––5–7–––7–|–5–––5–7–––7–5–––5–7–––7–|–
D ||–0–––0–0–––0–0–––0–0–––0–|–0–––0–0–––0–0–––0–0–––0–|–5–––5–5–––5–5–––5–5–––5–|–5–––5–5–––5–5–––5–5–––5–|–
D D D D G G G G
1 & a 2 & a 3 & a 4 & a 1 & a 2 & a 3 & a 4 & a 1 & a 2 & a 3 & a 4 & a 1 & a 2 & a 3 & a 4 & a
E –|–––––––––––––––––––––––––|–––––––––––––––––––––––––|–––––––––––––––––––––––––|–––––––––––––––––––––––––||
B –|–––––––––––––––––––––––––|–––––––––––––––––––––––––|–––––––––––––––––––––––––|–––––––––––––––––––––––––||
G –|–––––––––––––––––––––––––|–––––––––––––––––––––––––|–––––––––––––––––––––––––|–––––––––––––––––––––––––||
D –|–––––––––––––––––––––––––|–––––––––––––––––––––––––|–––––––––––––––––––––––––|–––––––––––––––––––––––––||
A –|–7–––7–9–––9–7–––7–9–––9–|–5–––5–7–––7–5–––5–7–––7–|–0–––0–2–––2–0–––0–2–––2–|–7–––7–9–––9–7–––7–9–––9–||
D –|–7–––7–7–––7–7–––7–7–––7–|–5–––5–5–––5–5–––5–5–––5–|–0–––0–0–––0–0–––0–0–––0–|–7–––7–7–––7–7–––7–7–––7–||
A A G G D D A A
1 & a 2 & a 3 & a 4 & a 1 & a 2 & a 3 & a 4 & a 1 & a 2 & a 3 & a 4 & a 1 & a 2 & a 3 & a 4 & a
Jack Johnson-style riff
Very similar is this riff, which I demonstrate in the video. Here, you’ll only press your additive finger down on the 3rd count of each sequence (and be sure to accent that count). Also, there’s a transitional walkdown sequence that is used when going from the A to the G (which I mark as “A*”). Watch my video for context.
E –––––––––––––– –––––––––––––– –––––––––––––– ––––––––––––––
B –––––––––––––– –––––––––––––– –––––––––––––– ––––––––––––––
G –––––––––––––– –––––––––––––– –––––––––––––– ––––––––––––––
D –––––––––––––– –––––––––––––– –––––––––––––– ––––––––––––––
A ––0––0––2––0–– ––7––7––9––7–– ––7––7––6––6–– ––5––5––7––5––
D ––0––0––0––0–– ––7––7––7––7–– ––7––7––6––6–– ––5––5––5––5––
D A A* G
And for each chord below, play the corresponding riff one time. E.g., begin by playing the D sequence four times in a row, then move to the G sequence four times in a row (etc).
D D D D A A A A* G G G G D D A A
The same sequence written out as a full tab is as follows. The main idea here is to emphasize the “2” and “4” counts, if you can – as that’s where your additive note is being played, which adds the distinctive sound to the riff for each chord.
E ||–––––––––––––––––|–––––––––––––––––|–––––––––––––––––|–––––––––––––––––|–
B ||–––––––––––––––––|–––––––––––––––––|–––––––––––––––––|–––––––––––––––––|–
G ||–––––––––––––––––|–––––––––––––––––|–––––––––––––––––|–––––––––––––––––|–
D ||–––––––––––––––––|–––––––––––––––––|–––––––––––––––––|–––––––––––––––––|–
A ||–0–0–2–0–0–0–2–0–|–0–0–2–0–0–0–2–0–|–7–7–9–7–7–7–9–7–|–7–7–9–7–7–7–6–6–|–
D ||–0–0–0–0–0–0–0–0–|–0–0–0–0–0–0–0–0–|–7–7–7–7–7–7–7–7–|–7–7–7–7–7–7–6–6–|–
D D D D A A A A*
1 + 2 + 3 + 4 + 1 + 2 + 3 + 4 + 1 + 2 + 3 + 4 + 1 + 2 + 3 + 4 +
E –|–––––––––––––––––|–––––––––––––––––|–––––––––––––––––|–––––––––––––––––||
B –|–––––––––––––––––|–––––––––––––––––|–––––––––––––––––|–––––––––––––––––||
G –|–––––––––––––––––|–––––––––––––––––|–––––––––––––––––|–––––––––––––––––||
D –|–––––––––––––––––|–––––––––––––––––|–––––––––––––––––|–––––––––––––––––||
A –|–5–5–7–5–5–5–7–5–|–5–5–7–5–5–5–7–5–|–0–0–2–0–0–0–2–0–|–7–7–9–7–7–7–9–7–||
D –|–5–5–5–5–5–5–5–5–|–5–5–5–5–5–5–5–5–|–0–0–0–0–0–0–0–0–|–7–7–7–7–7–7–7–7–||
G G G G D D A A
1 + 2 + 3 + 4 + 1 + 2 + 3 + 4 + 1 + 2 + 3 + 4 + 1 + 2 + 3 + 4 +
How to practice these
First, understand these foundational chord positions we’ll be using. 5th and 6th strings only for all three chords. For the G and the A, use your left index finger to barre the 5th and 6th strings on either the 5th fret (for the G chord) or the 7th fret (for the A) chord. See my video lesson for a demonstration.
E ––––––– ––––––– –––––––
B ––––––– ––––––– –––––––
G ––––––– ––––––– –––––––
D ––––––– ––––––– –––––––
A –––0––– –––5––– –––7–––
D –––0––– –––5––– –––7–––
D G A
Next, the idea is to add a single note on top of the existing chord positions you know – and to get comfortable going back & forth between the main chord position, and the with-added-note chord position. For the D, you’ll want to add a single finger on the 2nd fret of the 5th fret (left index is fine). For the G and the A, you’ll want to use your left ring finger to play the additional note – while your left index is barring the 5th or 7th fret. Again, see my video lesson for a demonstration.
E –––––––––– –––––––––– ––––––––––
B –––––––––– –––––––––– ––––––––––
G –––––––––– –––––––––– ––––––––––
D –––––––––– –––––––––– ––––––––––
A –––0––2––– –––5––7––– –––7––9–––
D –––0––0––– –––5––5––– –––7––7–––
D G A
Once you have this worked out, you’ll be able to tackle the riffs shown above. Good luck!
Enjoy my lessons? Buy me a beer!
If this and my other lessons have proven helpful to you, please consider making a one-time donation to my tip jar. Contributions of any amount help make this project possible (including the many, many hours I put into it).
Fun & Helpful Tools I've Made
Subscribe to my YouTube channel
Be sure to never miss a lesson by subscribing on YouTube. I put out 2-3 new videos every week. These include full song lessons, as well as covers, practice tips, behind-the-scenes updates. Thanks!
Recent Lessons
-
November 22, 2023
10 Years of Song Notes... Thanks to You!
-
November 17, 2023
Guitar Finger Exercises for Flexibility, Control, Speed, and more
-
November 10, 2023
Lead Guitar Improvisation Tips (feat. Wagon Wheel)
-
November 5, 2023
Travis Picking Training Wheels (ft. Hayes Carll)
-
November 4, 2023
Strumming with Alternating Bass Notes
-
November 3, 2023
Long Black Veil
-
October 28, 2023
St James Infimary Blues
-
October 21, 2023
Fingerstyle Patterns for All Chords (using Travis Picking)
-
October 16, 2023
Soulful Lead Guitar Licks over "Amazing Grace"
-
October 11, 2023
Helpful Tips for Hammer-Ons, Pull-Offs, and Bends