Copperhead Road
by Steve Earle • Lesson #213 • Feb 7, 2019
Video lesson
Print-Friendly Song Sheet 6 pages
Follow along with my print-friendly guide for this song! It’s available for purchase at Musicnotes.com, the web’s leading provider of licensed sheet music.
On the fence? Here's a guide I made showing the purchase & print process, including answers to common questions about my song sheets.
Buy at Musicnotes.comEditor’s notes
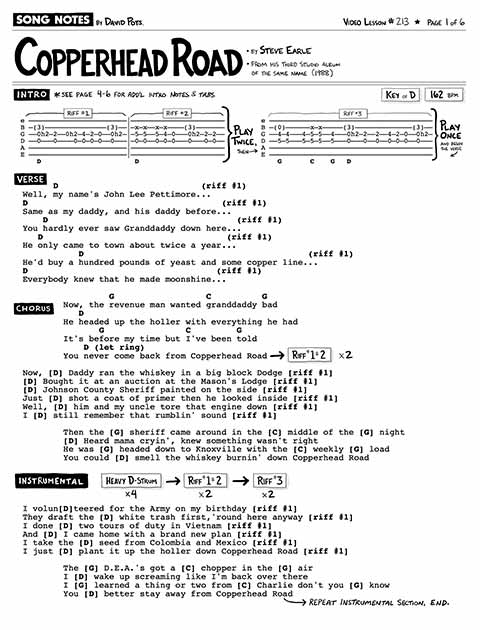
In this lesson I’ll teach you to play the Steve Earle song “Copperhead Road” - complete with the intro tab, chords needed for the verse & chorus, the strumming patterns you’ll use, and a whole lotta additional tips & tricks to get you on your way. This song came in by request on my Patreon page - I hadn’t heard it before, but am sure glad I know it now! Great fun to play, lots of joy to be had working out that droning D riff. Enjoy!
Video timestamps:
- 0:00 Playthrough & overview
- 2:11 Chords needed
- 4:15 Mastering the D hammer-on
- 5:21 Playing the riff w/ 1 finger
- 6:57 Mastering the D pinky stretch
- 8:53 Learning the full riff
- 14:48 Verse & chorus
- 16:44 Strumming pattern
- 21:02 Final advice
Lyrics with chords
See sheet music (page 1) for all lyrics with chords and intro riff included.
Chord Shapes: The Absolute Basics
Before I get deeper into the “riff” that makes up the bulk of this song, I wanted to quickly point out the chord shapes used. If you only care about strumming and don’t need or want to play the riff – then here’s the only chords you’ll need. Basic G-C-D. For the G and C, I show a few options below which might make the quick change (from G to C to G) easier for you.
See sheet music for the chord diagrams.
Chord Shapes: Essential Mods to the D-major
Theres two important alternatives to the typical D-major chord I want to show you, before we move on. You could, in theory, use these when doing a simple strummed version. But they really prove their worth when we combine chords with the melodic riff, which I’ll cover in the next section. The two chord voicings of note are:
The “power chord” voicing
When playing the D-major chord you may want to try to avoid the high E-string (either don’t strum it, or don’t press your left-hand finger down firmly on that string). This creates more of a neutral, non-cheery “power chord” sound to the D-chord, which fits the vibe of this song well. This version also makes the melodic riff easier to play when strumming the D. This voicing also comes in handy for the “power chord” section of the interludes.
E –––x––– <== don't play (or, mute w/ l. middle)
B –––3––– <== left middle finger
G –––2––– <== left index finger
D –––0–––
A –––––––
E –––––––
D
The “Add 5” voicing
Another voicing to consider, which is a bit trickier but sounds more full – is adding your left pinky to the 3rd fret of the high-E string. If this is too much of a stretch, you can ignore this voicing and use the regular D or the “power chord” voicing shown above.
E –––5––– <== left pinky finger
B –––3––– <== left middle finger
G –––2––– <== left index finger
D –––0–––
A –––––––
E –––––––
D
Mastering the D-chord hammer-on
One crucial part of the D-major flourish heard in this song involves hammering on the 3rd string note from open (nothing pushed down) to 2nd fret (pushed down with your index finger). You’ll only strum the chord once with your right hand, but by hammering this note on after the strum, it almost sounds as if you’re playing a second strum. This is something you’ll want to use quite liberally when playing this song, since you’ll be on D so much – adding this little touch can break up the monotony.
E –––x––––
B –––3––––
G –––0h2–– <= strum with no finger pressing down on this string,
D –––0–––– and after the strum press your left index finger
A –––––––– down forcefully. If done right, this will make
E –––––––– that note ring cleanly (which is the ideal).
D
Mastering the D-chord 4th fret stretch
In the first part of the main riff, you’ll need to add a 4th fret note to the 3rd string. This requires a bit of a stretch with either your left pinky or left ring finger, depending on how you’re playing the D. In both cases, keep your left index finger on the 2nd fret note (of the 3rd string) while adding the 4th fret note. This makes the riff easier to play.
See sheet music for the chord diagrams.
Playing the intro riff with one finger
A great way to start off learning this song, especially if the main riff is giving you trouble, is to practice with this approach. You’ll only be playing on two of the strings, and can in fact play it with a single finger (left hand) if you wanted. I feel that this may help you get the grasp of the timing and melody, which can inject a nice bit of confidence. See my video lesson for reference.
First, start without the hammer-ons:
See sheet music for the tab.
Then, add the hammer-ons (2nd fret of 3rd string):
See sheet music for the tab.
Adding strumming to the intro riff
Once you have the simplified riff (above) worked out, here’s the tab I’d recommend using for the “full” riff. One goal here is to put your left hand in the D-major shape, and not shy away from strumming the 2nd string. Likewise, you can keep your right hand strumming motion a bit more constant, and not be afraid to add in some delicate brushes on the strings as part of your natural rhythm. This may result in some strums that aren’t accounted for in this tab - but that’s okay!
See sheet music for the tab.
You can take this even further if you want, by adding your left pinky to the 5th fret of the high-E string (and playing the 4th fret notes on the G-string with your left ring finger). This is trickier, but sounds much more full.
See sheet music for the tab.
Strumming pattern
Main pattern:
1 e + a 2 e + a 3 e + a 4 e + a
d d u d u d d u d d u
As used in the verse:
"Well, my name's John Lee Pettimore..."
D * * * = hammer on 3rd string of D chord
1 e + a 2 e + a 3 e + a 4 e + a
d d u d u d d u d d u
As used in the chorus:
"Now, the revenue man wanted grand daddy bad..."
G C G
1 e + a 2 e + a 3 e + a 4 e + a
d d u d u d d u d d u
"He headed up the holler with everything he had..."
D * * * = hammer on 3rd string of D chord
1 e + a 2 e + a 3 e + a 4 e + a
d d u d u d d u d d u
Interlude power chord strumming
Finally, we have this “power chord” rock-out section of the interlude, which involves heavy use of the D power chord. This is characterized by a loud, rapid “down-up-down-up-down” strumming pattern, which is followed by a moment of silence before repeating again.
D x D x x = silence all strings
1 e + a 2 e + a 3 e + a 4 e + a
d u d u d d u d u d
Enjoy my lessons? Buy me a beer!
If this and my other lessons have proven helpful to you, please consider making a one-time donation to my tip jar. Contributions of any amount help make this project possible (including the many, many hours I put into it).
Fun & Helpful Tools I've Made
Subscribe to my YouTube channel
Be sure to never miss a lesson by subscribing on YouTube. I put out 2-3 new videos every week. These include full song lessons, as well as covers, practice tips, behind-the-scenes updates. Thanks!
Recent Lessons
-
June 3, 2023
Pentatonic Fun with Billy Strings' "Lonely At The Top" Riff
-
June 2, 2023
Major Pentatonic Scales in Open Position
-
May 27, 2023
"Fast Car" Riff, Explained Step-by-Step!
-
May 23, 2023
Uncle John's Band
-
May 16, 2023
Learn the Percussive Slap Strum, Step by Step
-
May 12, 2023
Tips for Writing Guitar Tabs (on Paper and iPad)
-
May 8, 2023
First Steps with the "Amie" Intro Riff
-
May 3, 2023
Easy-Going Fingerstyle Blues! A Step-by-Step Guide.