Video Overview
Instructional PDF 2 pages
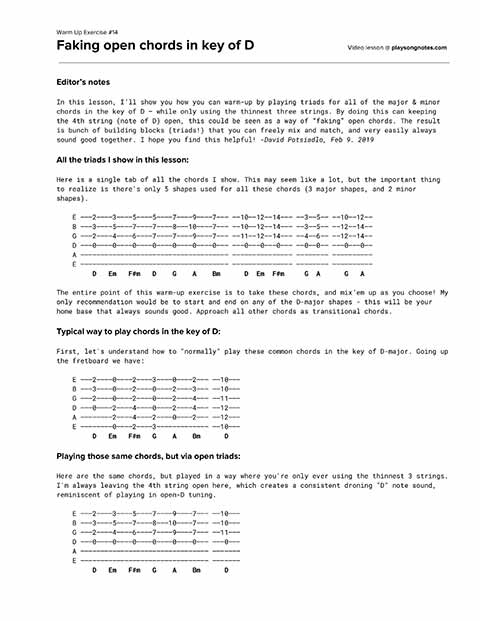
Editor’s notes
In this lesson, I’ll show you how you can warm-up by playing triads for all of the major & minor chords in the key of D – while only using the thinnest three strings. By doing this can keeping the 4th string (note of D) open, this could be seen as a way of “faking” open chords. The result is bunch of building blocks (triads!) that you can freely mix and match, and very easily always sound good together. I hope you find this helpful!
The typical way to play chords in the key of D
First, let’s understand how to “normally” play these common chords in the key of D-major. Going up the fretboard we have:
E –––2––––0––––2––––3––––0––––2––– ––10–––
B –––3––––0––––2––––0––––2––––3––– ––10–––
G –––2––––0––––2––––0––––2––––4––– ––11–––
D –––0––––2––––4––––0––––2––––4––– ––12–––
A ––––––––2––––4––––2––––0––––2––– ––12–––
E ––––––––0––––2––––3––––––––––––– ––10–––
     D   Em   F#m   G    A    Bm      D
Playing “open” triad chords in the key of D
Here are the same chords, but played in a way where you’re only ever using the thinnest 3 strings. I’m always leaving the 4th string open here, which creates a consistent droning “D” note sound, reminiscent of playing in open-D tuning.
E –––2––––3––––5––––7––––9––––7––– ––10–––
B –––3––––5––––7––––8–––10––––7––– ––10–––
G –––2––––4––––6––––7––––9––––7––– ––11–––
D –––0––––0––––0––––0––––0––––0––– –––0–––
A –––––––––––––––––––––––––––––––– –––––––
E –––––––––––––––––––––––––––––––– –––––––
     D   Em   F#m   G    A    Bm      D
All of the triads I show in this lesson
Here is a single tab of all the chords I show. This may seem like a lot, but the important thing to realize is there’s only 5 shapes used for all these chords (3 major shapes, and 2 minor shapes).
E –––2––––3––––5––––5––––7––––9––––7––– ––10––12––14––– ––3––5–– ––10––12––
B –––3––––5––––7––––7––––8–––10––––7––– ––10––12––14––– ––3––5–– ––12––14––
G –––2––––4––––6––––7––––7––––9––––7––– ––11––12––14––– ––4––6–– ––12––14––
D –––0––––0––––0––––0––––0––––0––––0––– –––0–––0–––0––– ––0––0–– –––0–––0––
A ––––––––––––––––––––––––––––––––––––– ––––––––––––––– –––––––– ––––––––––
E ––––––––––––––––––––––––––––––––––––– ––––––––––––––– –––––––– ––––––––––
     D   Em   F#m   D    G    A    Bm      D  Em  F#m     G  A      G   A
Finger positions for the major chord shapes
For the familiar “D major” shape, here are two ways to approach the fingering:
e –––2––––7––––9––– <= left middle         e –––2––––7––––9––– <= left index (barred)
B –––3––––8–––10––– <= left ring           B –––3––––8–––10––– <= left middle
G –––2––––7––––9––– <= left index    OR    G –––2––––7––––9––– <= left index (barred)
D –––0––––0––––0–––                        D –––0––––0––––0–––
A –––––––––––––––––                        A –––––––––––––––––
E –––––––––––––––––                        E –––––––––––––––––
     D    G    A                                D    G    A
For the shape that is reminiscent of the F-major (133211) chord’s thinnest three strings, I use this fingering.
e ––10––––3––––5––– <= left index (barred)
B ––10––––3––––5––– <= left index (barred)
G ––11––––4––––6––– <= left middle
D –––0––––0––––0–––
A –––––––––––––––––
E –––––––––––––––––
     D    G    A
Finally, there’s this shape which is based off the open A-major chord, or the barred D-major chords (x57775):
e –––5–––10–––12––– <= left index
B –––7–––12–––14––– <= left pinky
G –––7–––12–––14––– <= left ring
D –––0––––0––––0–––
A –––––––––––––––––
E –––––––––––––––––
     D    G    A
Finger positions for the minor chord shapes
For the familiar “D minor” shape, here’s how I place my fingers:
e –––3––––5–––10––– <= left index
B –––5––––7–––12––– <= left pinky (or ring)
G –––4––––6–––11––– <= left middle
D –––0––––0––––0–––
A –––––––––––––––––
E –––––––––––––––––
     Em  F#m  Bm
For the shape that’s based off the typical F#m (244222), where you’re playing the thinnest 3 strings on the same fret, I use this fingering:
e ––12–––14––––7––– <= barred w/ left ring (or index)
B ––12–––14––––7––– <= barred w/ left ring (or index)
G ––12–––14––––7––– <= barred w/ left ring (or index)
D –––0––––0––––0–––
A –––––––––––––––––
E –––––––––––––––––
     Em  F#m  Bm
Now, mix and match these chord shapes!
Think of each of these chord shapes as a building block - which can be freely used & combined in any order. Keep this in mind when playing these shapes. Try out a few of them together, in a pattern, and repeat. Experiment with different strumming patterns. Mix it up! Especially when you’re warming up, this sort of free play can be very helpful to get the blood flowing and try something new.
Good luck!
I hope this was helpful. As always, I encourage you to be in touch with any questions.
Browse Related Lessons
Click any tag below to view other lessons I've made in that category:
Enjoy My Lessons? Show Your Support!
Most of the lessons on my website are 100% free. If you have the means, please show your support with a tip jar contribution. I put many hours into every lesson — but it only takes you a minute to make a donation. You have my thanks!
Looking for More Song Lessons?
Featured Courses
Fun & Helpful Tools I've Made
Coming soon is Jambox – which shows all the video jam tracks I've made. It's note quite ready for the spotlight, but check it out if you like!
Subscribe to my YouTube channel
Be sure to never miss a lesson by subscribing on YouTube. I put out 2-3 new videos every week. These include full song lessons, as well as covers, practice tips, behind-the-scenes updates. Thanks!
Recent Lessons
-
July 3, 2026
"Ramble On" by Led Zeppelin (full song lesson)
-
June 21, 2026
Dad-Inspired Songs for Father's Day
-
June 12, 2026
"Ramble On" Acoustic Bassline Groove (Led Zeppelin)
-
June 6, 2026
Melody, with Chords: "Love Me Tender"
-
June 5, 2026
"Love Me Tender" as played by Elvis Presley
-
May 29, 2026
Learning Triads with "Happy Birthday" (Key of G)
-
May 19, 2026
Guitar Jam Tracks: How I Make Them!
-
May 4, 2026
New and Improved! Song List Update.
-
April 24, 2026
Country Fingerstyle, Melody + Bass (feat. "Live Forever" by Billy Joe Shaver)