Video lesson
Licensed Song Sheet 4 pages
Follow along with my print-friendly guide for this song! It’s available for purchase at Musicnotes.com, the web’s leading provider of licensed sheet music.
On the fence? Here's a guide I made showing the purchase & print process, including answers to common questions about my song sheets.
Buy at Musicnotes.comEditor’s notes
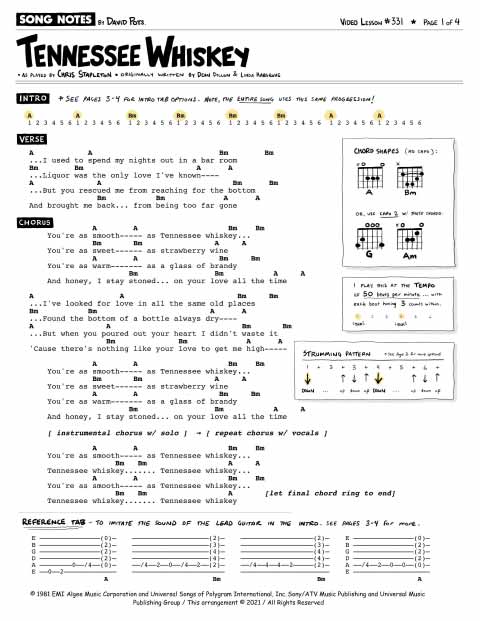
Hey friends! New lesson here, where I’ll show you how to play a solo acoustic version of Tennessee Whiskey by Chris Stapleton. This one has a simple structure (it only uses A and B-minor), but there’s so much fun to be had by adding small riffs between these two chords. In my lesson I’ll start with the basics (basic chord shapes & 3 strumming options) – and then I’ll get into some more advanced stuff, including chord variations and a few ways you can combine lead fills with your strumming.
Video timestamps:
- 0:00 Preview & lesson overview
- 1:47 Chord shapes needed (basics)
- 3:29 Chord progression for entire song
- 4:42 Strumming patterns (3 options)
- 11:02 Advanced: Modifying the A & B-minor chords
- 15:45 Advanced: Combining lead riffs w/ strumming
My other videos for this song
Practicing A-Bm with a Backing track (Lesson #195)
Here’s a video backing track of A-major and B-minor, which is helpful to practice the guitar parts (rhythm or lead) used in this song. For additional guidance, view my post for lesson #195 which includes a video tutorial and download links (for the PDF with tabs, plus jam track audio file).
Spicing up a 2-chord song (Lesson #191)
Here’s another tutorial that teaches you how to play this in the key of G (using the chords G and A-minor), to get a similar sound but through different riffs and licks. If you can’t play barre chords comfortable, I recommend giving this one a watch. For additional guidance, view my post for lesson #191 which includes the PDF download (with tabs).
Lyrics w/ chords
See my sheet music for all the lyrics, with chords shown above them.
How to play the chords
Two chords for the entire song! Can’t go wrong with that. Without a capo, they look like this. Note, I’m showing the chords for the no capo version (A and Bm), but am also including the chords if you want to add a capo to the 2nd fret (G and Am) – which might be helpful if you can’t easily play B-minor yet.
See my song sheet for diagram
Chord progression & rhythm
Now that we have the chords, let’s talk a moment about rhythm, timing, and when to switch chords. Straight up, this song uses the exact same progression for the entire song - for intro, verse, chorus, and solo sections. That makes it super easy to remember! The progression looks like this:
A           A           Bm          Bm          Bm          Bm          A           A
1 2 3 4 5 6 1 2 3 4 5 6 1 2 3 4 5 6 1 2 3 4 5 6 1 2 3 4 5 6 1 2 3 4 5 6 1 2 3 4 5 6 1 2 3 4 5 6
Six counts per each measure. The chord change always happens on the “1” count. Note how this equates to 2 measures of A-major, 4 measures of B-minor, and finally 2 measures of A-major. Then it all repeats, over and over again.
Strumming pattern
Given the chord progression, let’s talk about strumming. You have a few options, and they all will be based around putting an accent (extra emphasis) on the “1” and “4” counts of each measure. Start by doing a single down strum on the “1” and “4”. This would be spoken as “down… down… down… down…”
1 + 2 + 3 + 4 + 5 + 6 +
d           d
>           >
From there, you could spice it up by doing a down strum on every count - but keeping the emphasis on the “1” and “4” counts. All other counts should get a light feathery strum. This trains your strumming hand to always be moving in the correct rhythm, regardless of strum power. This would be spoken as “DOWN down down DOWN down down DOWN down down” (etc).
1 + 2 + 3 + 4 + 5 + 6 +
d   d   d   d   d   d
>           >
Now, to play the exact strum you hear on the album version of this song, you’ll want to use this pattern. Note, how the accent on the “1” and “4” still exists, even though you’re adding additional down and up strums. This would be spoken as “DOWN… up down up DOWN… up down up DOWN… up down up” (etc).
1 + 2 + 3 + 4 + 5 + 6 +
d     u d u d    u d u
>           >
Spicing up the chord voicings
A few ways to spice things up, should you want. For one, this is a great song to play the A-major chord with a barred index finger (across all the 2nd fret notes, with the high E-string muted). This makes the B-minor easier to switch to, since your left index finger is already barring most of that fret. Also, it allows for easier muting of all the strings - which I cover later in this lesson.
See my song sheet for diagram
There’s also ample opportunity to add small tweaks to the A and B-minor chords by either adding or removing fingers, within the strum patterns. Doing this freely & casually can help add a very helpful dose of diversity to the sound of this song. Here are some of the common tweaks you can do… practice going back and forth between the “main” voicing any each alternate voicing shown here:
See my song sheet for diagram
Using a percussive strum style
Now, the strumming patterns above might be all you’re looking for. But if you want to dial up the dynamics a little bit, let’s look at some ways to add some percussive spice to your strumming. For starters, use this tab when playing each chord. Pluck the bass note on the 1 count, and strum the rest of the chord on the 4 count.
See my song sheet for diagram
Also, if you can, silence the chord immediately after the 4 count. Do this by touching either your left or right hand lightly against all the strings (release the chord shape with your left hand, even if you keep your fingers touching the strings).
See my song sheet for diagram
Given this, you can go through the entire chord progression using this chord style - and it adds a very nice percussive sound with your guitar. Very handy if you don’t have a band playing with you!
See my song sheet for diagram
Adding some walking bass notes
Want to imitate the sound of the bass you hear on the album version of this song? Here’s how! Simply use this pattern:
See my sheet music for the tab.
Once you have this, if you want, you can try to squeeze in some quick chord strums on some of the “4” counts. Note, this can be tough with regard to timing! But give it a try - feels great and really starts to make the dots connect.
See my sheet music for the tab.
Or, you could go back to the prior exercise (bass note => single strum) and bring in a single walking bass note. As follows:
See my sheet music for the tab.
Intro licks
Here’s the lead licks that are heard in the intro to the song. Note, these licks all begin on the “4” count of the measure they’re in (exception: the third lick starts on the “5” count). This includes when the song begins, which is on the “4” count of lead-in measure before the first full measure of the song. After each lick, the full chord that follows gets its complete strum on the “4” count of the following measure.
Also, I recommend you try this riff using just one finger (left index) for all the lead notes. This helps the slides fall into place much more easily. Using your left index finger allows it to easily be in position to play the full chords, if that’s your goal. See my video lesson for reference here - it will help big time.
See my sheet music for the tab.
Typed out in tab form with the counting included, it would look like this. The key thing to notice here is how the first lick comes in on the 4-5-6 counts of a partial measure that precedes the first full measure.
See my sheet music for the tab.
Intro licks with added basslines and chord strums
This is my favorite! It takes the distinctive intro licks, but also adds some chord strums as well as some tidbits from the bassline tab we looked at earlier.
See my sheet music for the tab.

Browse Related Lessons
Click any tag below to view other lessons I've made in that category:
Enjoy My Lessons? Show Your Support!
Most of the lessons on my website are 100% free. If you have the means, please show your support with a tip jar contribution. I put many hours into every lesson — but it only takes you a minute to make a donation. You have my thanks!
Looking for More Song Lessons?
Featured Courses
Fun & Helpful Tools I've Made
Coming soon is Jambox – which shows all the video jam tracks I've made. It's note quite ready for the spotlight, but check it out if you like!
Subscribe to my YouTube channel
Be sure to never miss a lesson by subscribing on YouTube. I put out 2-3 new videos every week. These include full song lessons, as well as covers, practice tips, behind-the-scenes updates. Thanks!
Recent Lessons
-
May 4, 2026
New and Improved! Song List Update.
-
April 24, 2026
Country Fingerstyle, Melody + Bass (feat. "Live Forever" by Billy Joe Shaver)
-
April 21, 2026
Sneak Peek! Step-by-Step Travis Picking Course
-
April 10, 2026
"Free Fallin'" by Tom Petty
-
March 23, 2026
"I'm a Little Crazy" by Morgan Wallen
-
March 17, 2026
[Fixed] Minor Pentatonic Cheat Sheet - Download Link Fixed!
-
March 13, 2026
Guitar Tech Tip: Change the Key of Any YouTube Video
-
March 12, 2026
[Updated] Strum & Riff Guide for "About a Girl" by Nirvana
-
March 3, 2026
Strumming Issues? Try the "Pyramid" Rhythm Drill