In this lesson, I show a practice tip on how you can transition between the chords of E, A, and B7 – specifically by playing bass notes that walk up and down between these chords. This is a very common technique you’ll find in lots of country music, especially from artists like Johnny Cash (e.g., Walk the Line) and Willie Nelson (e.g., Angel Flying Too Close to the Ground). I’ll show you the basics of how to play the chords used (E, A, and B7 – including tabs) and then break down the fundamentals of this technique.
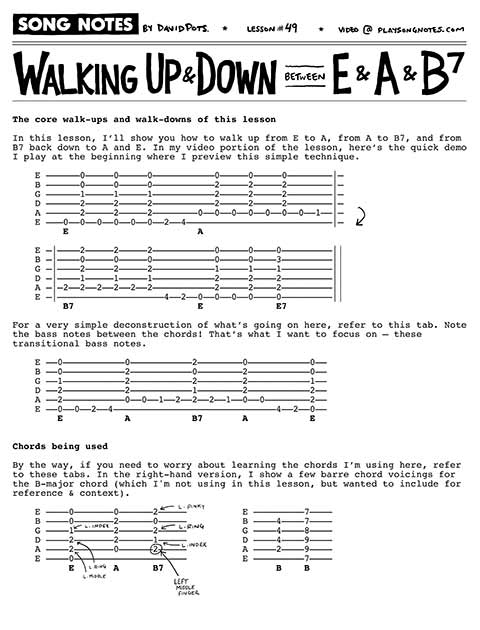
In this lesson, I’ll show you how to walk up from E to A, from A to B7, and from B7 back down to A and E. In my video portion of the lesson, here’s the quick demo I play at the beginning where I preview this simple technique.
E ––––––0–––––0–––––0–––––––––––0–––––0–––––0––––––––|–
B ––––––0–––––0–––––0–––––––––––2–––––2–––––2––––––––|–
G ––––––1–––––1–––––1–––––––––––2–––––2–––––2––––––––|–
D ––––––2–––––2–––––2–––––––––––2–––––2–––––2––––––––|–
A ––––––2–––––2–––––2––––––––0––0––0––0––0––0––0––1––|–
E –––0––0––0––0––0––0––2––4––––––––––––––––––––––––––|–
     E                       A

E –|––––2–––––2–––––2–––––––––––0–––––0––––0–––––––––||
B –|––––0–––––0–––––0–––––––––––0–––––0––––3–––––––––||
G –|––––2–––––2–––––2–––––––––––1–––––1––––1–––––––––||
D –|––––1–––––1–––––1–––––––––––2–––––2––––2–––––––––||
A –|–2––2––2––2––2––2–––––––––––2–––––2––––2–––––––––||
E –|–––––––––––––––––––4––2––0––0––0––0––––0–––––––––||
     B7                      E             E7
For a very simple deconstruction of what’s going on here, refer to this tab. Note the bass notes between the chords! That’s what I want to focus on – these transitional bass notes.
E ––0–––––––––––0–––––––––––2––––––––0–––––––––––0––
B ––0–––––––––––2–––––––––––0––––––––2–––––––––––0––
G ––1–––––––––––2–––––––––––2––––––––2–––––––––––1––
D ––2–––––––––––2–––––––––––1––––––––2–––––––––––2––
A ––2–––––––––––0––0––1––2––2––2––1––0––0––––––––2––
E ––0––0––2––4–––––––––––––––––––––––––––––4––2––0––
    E           A           B7       A           E
By the way, if you need to worry about learning the chords I’m using here, refer to these tabs. In the right-hand version, I show a few barre chord voicings for the B-major chord (which I’m not using in this lesson, but wanted to include for reference & context).
E ––––0–––––––0––––––2–––––          E –––––––––7––––
B ––––0–––––––2––––––0–––––          B ––––4––––7––––
G ––––1–––––––2––––––2–––––          G ––––4––––8––––
D ––––2–––––––2––––––1–––––          D ––––4––––9––––
A ––––2–––––––0––––––2–––––          A ––––2––––9––––
E ––––0––––––––––––––––––––          E –––––––––7––––
      E       A      B7                    B    B
If you’re just getting started with this run, first worry about E and A (don’t bring in B7 yet). Repeat this sequence, going from E to A and back down to E. Repeat.
E –––––0–––––0–––––0–––––––––––0–––––0–––––0––––––––
B –––––0–––––0–––––0–––––––––––2–––––2–––––2––––––––
G –––––1–––––1–––––1–––––––––––2–––––2–––––2––––––––
D –––––2–––––2–––––2–––––––––––2–––––2–––––2––––––––
A –––––2–––––2–––––2––––––––0––0––0––0––0––0––––––––
E ––0––0––0––0––0––0––2––4––––––––––––––––––––4––2––
    E                       A
Then, worry about going from A to B7 and back to A. Repeat.
E –––––0–––––0–––––0–––––––––––2–––––2–––––2––––––––
B –––––2–––––2–––––2–––––––––––0–––––0–––––0––––––––
G –––––2–––––2–––––2–––––––––––2–––––2–––––2––––––––
D –––––2–––––2–––––2–––––––––––1–––––1–––––1––––––––
A ––0––0––0––0––0––0––0––1––2––2––2––2––2––2––2––1––
E ––––––––––––––––––––––––––––––––––––––––––––––––––
    A                       B7
When you’ve mastered these two transitions, you can do the full E to A to B7 back down to A and E.
When playing the bass notes, I strongly recommend using your middle and ring fingers (in addition to your index finger). While you technically can pull this off using only your index finger, it’s a bad habit that I suggest avoiding. You need to train your weaker fingers (middle, ring, pinky) – and though it can be frustrating at first it pays off later.
Here’s a simple exercise I suggest:
E –––––––––––––––––––––––––––––
B –––––––––––––––––––––––––––––
G –––––––––––––––––––––––––––––                     2nd fret = index finger
D –––––––––––––––––––––––––––––   ...repeat         3rd fret = middle finger
A –––––––––––––––––––––––––––––                     4th fret = ring finger
E –––2––3––4––3––2––3––4––3––––
“Walk the Line” by Johnny Cash is a powerhouse example of this technique used a ton. Here’s the first few measures. See my full lesson on this song if you want to learn it in full.
E –––––––––––0–––0––––––––––––2–––2––––––––––––0––––
B –––––––––––2–––2––––––––––––3–––3––––––––––––2––––
G –––––––––––2–––2––––––––––––2–––2––––––––––––2––––
D –––––––––––2–––2–––––––––0––––––––0–0––––––––2––––
A ––––––––0––––––––0–0–2–4––––––0–––––––4–2–0––0––––
E ––0–2–4––––––0––––––––––––––––––––––––––––––––––––
             A                D                A
“Angel Flying Too Close to the Ground” by Willie Nelson has a similar run with these notes.
E –––0––––––––––––––––––––––––0––––
B –––0––––––––––––––––––––––––2––––
G –––1––––––––––––––––––––––––2––––
D –––2––––––––––––––––––––––––2––––
A –––2–––––––––––––––––––0––––0––––
E –––0–––0–––1–––2–––4–––––––––––––
     E                        A