How I Learned to Travis Pick with "Clay Pigeons"

Lesson #173 • Sep 13, 2018

Video Overview

Instructional PDF 5 pages

Follow along with the print-friendly PDF! It includes all of my notes for this lesson, allowing you to follow along at your own pace. You're free to download, print, and share the PDF across your devices.

Thanks for being a Premium member of Song Notes! Your support makes these lessons possible.

Download PDF

Follow along with the print-friendly PDF!

It includes all of my notes for this lesson, allowing you to follow along at your own pace. You're free to download, print, and share the PDF across your devices.

To download the PDF, upgrade to premium or log in.

Editor’s Note

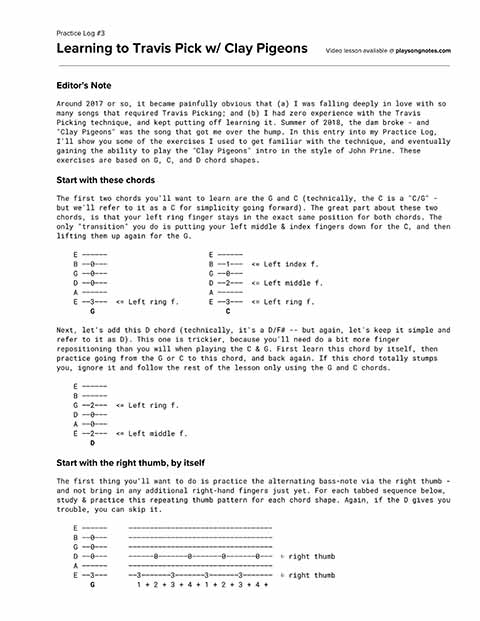
Around 2017 or so, it became painfully obvious that (a) I was falling deeply in love with so many songs that required Travis Picking; and (b) I had zero experience with the Travis Picking technique, and kept putting off learning it. Summer of 2018, the dam broke - and “Clay Pigeons” was the song that got me over the hump. In this entry into my Practice Log, I’ll show you some of the exercises I used to get familiar with the technique, and eventually gaining the ability to play the “Clay Pigeons” intro in the style of John Prine. These exercises are based on G, C, and D chord shapes.

Start with these chords

The first two chords you’ll want to learn are the G and C (technically, the C is a “C/G” - but we’ll refer to it as a C for simplicity going forward). The great part about these two chords, is that your left ring finger stays in the exact same position for both chords. The only “transition” you do is putting your left middle & index fingers down for the C, and then lifting them up again for the G.

E ––––––                        E ––––––    
B ––0–––                        B ––1–––  <= Left index f.    
G ––0–––                        G ––0–––    
D ––0–––                        D ––2–––  <= Left middle f.  
A ––––––                        A ––––––    
E ––3–––  <= Left ring f.       E ––3–––  <= Left ring f.
    G                               C     

Next, let’s add this D chord (technically, it’s a D/F# – but again, let’s keep it simple and refer to it as D). This one is trickier, because you’ll need do a bit more finger re-positioning than you will when playing the C & G. First learn this chord by itself, then practice going from the G or C to this chord, and back again. If this chord totally stumps you, ignore it and follow the rest of the lesson only using the G and C chords.

E ––––––
B ––––––
G ––2–––  <= Left ring f.
D ––0–––
A ––0–––
E ––2–––  <= Left middle f.
    D

Start with the right thumb, by itself

The first thing you’ll want to do is practice the alternating bass-note via the right thumb - and not bring in any additional right-hand fingers just yet. For each tabbed sequence below, study & practice this repeating thumb pattern for each chord shape. Again, if the D gives you trouble, you can skip it.

E ––––––     ––––––––––––––––––––––––––––––––––
B ––0–––     ––––––––––––––––––––––––––––––––––
G ––0–––     ––––––––––––––––––––––––––––––––––
D ––0–––     ––––––0–––––––0–––––––0–––––––0–––
A ––––––     ––––––––––––––––––––––––––––––––––
E ––3–––     ––3–––––––3–––––––3–––––––3–––––––
    G          1 + 2 + 3 + 4 + 1 + 2 + 3 + 4 +

E ––––––     ––––––––––––––––––––––––––––––––––
B ––1–––     ––––––––––––––––––––––––––––––––––
G ––0–––     ––––––––––––––––––––––––––––––––––
D ––2–––     ––––––2–––––––2–––––––2–––––––2–––
A ––––––     ––––––––––––––––––––––––––––––––––
E ––3–––     ––3–––––––3–––––––3–––––––3–––––––
    C          1 + 2 + 3 + 4 + 1 + 2 + 3 + 4 +

E ––––––     ––––––––––––––––––––––––––––––––––
B ––––––     ––––––––––––––––––––––––––––––––––
G ––2–––     ––––––––––––––––––––––––––––––––––
D ––0–––     ––––––0–––––––0–––––––0–––––––0–––
A ––0–––     ––––––––––––––––––––––––––––––––––
E ––2–––     ––2–––––––2–––––––2–––––––2–––––––
    D          1 + 2 + 3 + 4 + 1 + 2 + 3 + 4 +

Adding a pinch on the 1 count

Next, let’s take things a single step further - by playing the second string with our right middle finger on the “1” count of each measure. The important thing to realize here, is this creates “pinch” between our right middle finger and our right thumb. That is, both notes are being played at the same time. Everything else (the repeating right thumb) stays the same!

E ––––––     ––––––––––––––––––––––––––––––––––
B ––0–––     ––0–––––––––––––––0–––––––––––––––  <= right middle f.
G ––0–––     ––––––––––––––––––––––––––––––––––                     
D ––0–––     ––––––0–––––––0–––––––0–––––––0–––  <= right thumb    
A ––––––     ––––––––––––––––––––––––––––––––––                       
E ––3–––     ––3–––––––3–––––––3–––––––3–––––––  <= right thumb    
    G          1 + 2 + 3 + 4 + 1 + 2 + 3 + 4 +

E ––––––     ––––––––––––––––––––––––––––––––––
B ––1–––     ––1–––––––––––––––1–––––––––––––––  <= right middle f.
G ––0–––     ––––––––––––––––––––––––––––––––––                     
D ––2–––     ––––––2–––––––2–––––––2–––––––2–––  <= right thumb    
A ––––––     ––––––––––––––––––––––––––––––––––                     
E ––3–––     ––3–––––––3–––––––3–––––––3–––––––  <= right thumb    
    C          1 + 2 + 3 + 4 + 1 + 2 + 3 + 4 +

For the D, just note that we’re using our right index finger instead of our right middle finger (this makes things easier on the left hand, since no left-hand note is required on the B string).

E ––––––     ––––––––––––––––––––––––––––––––––
B ––––––     ––––––––––––––––––––––––––––––––––  
G ––2–––     ––2–––––––––––––––2–––––––––––––––  <= right index f.                   
D ––0–––     ––––––0–––––––0–––––––0–––––––0–––  <= right thumb    
A ––0–––     ––––––––––––––––––––––––––––––––––                     
E ––2–––     ––2–––––––2–––––––2–––––––2–––––––  <= right thumb    
    D          1 + 2 + 3 + 4 + 1 + 2 + 3 + 4 +

Adding a “2 +” note

After you have the “pinch” addition mastered, the next step is to add a single note on the “2 +” count of each measure. For the G and C chords, this new note will be with a different finger than is used on the “pinch” 1-count note.

E ––––––     ––––––––––––––––––––––––––––––––––
B ––0–––     ––0–––––––––––––––0–––––––––––––––  <= right middle f.
G ––0–––     ––––––––0–––––––––––––––0–––––––––  <= right index f.                  
D ––0–––     ––––––0–––––––0–––––––0–––––––0–––  <= right thumb    
A ––––––     ––––––––––––––––––––––––––––––––––                       
E ––3–––     ––3–––––––3–––––––3–––––––3–––––––  <= right thumb    
    G          1 + 2 + 3 + 4 + 1 + 2 + 3 + 4 +

E ––––––     ––––––––––––––––––––––––––––––––––
B ––1–––     ––1–––––––––––––––1–––––––––––––––  <= right middle f.
G ––0–––     ––––––––0–––––––––––––––0–––––––––  <= right index f.
D ––2–––     ––––––2–––––––2–––––––2–––––––2–––  <= right thumb    
A ––––––     ––––––––––––––––––––––––––––––––––                     
E ––3–––     ––3–––––––3–––––––3–––––––3–––––––  <= right thumb    
    C          1 + 2 + 3 + 4 + 1 + 2 + 3 + 4 +

We’ll keep the D the same as before - no changes. Again, this keeps things easy for the time being.

E ––––––     ––––––––––––––––––––––––––––––––––
B ––––––     ––––––––––––––––––––––––––––––––––  
G ––2–––     ––2–––––2–––––––––2–––––2–––––––––  <= right index f.                   
D ––0–––     ––––––0–––––––0–––––––0–––––––0–––  <= right thumb    
A ––0–––     ––––––––––––––––––––––––––––––––––                     
E ––2–––     ––2–––––––2–––––––2–––––––2–––––––  <= right thumb    
    D          1 + 2 + 3 + 4 + 1 + 2 + 3 + 4 +

Changing the picking order

If you want to take it even further, a good next-step is to keep the same notes you just played - but change the right-hand picking order. For example, here I swap the order that the right-hand middle and index finger are played. Compare this to the prior tab sequences to see what I mean. This starts to show you how far you can mix up the sound by making very small changes.

E ––––––     ––––––––––––––––––––––––––––––––––
B ––0–––     ––––––––0–––––––––––––––0–––––––––  <= right middle f.
G ––0–––     ––0–––––––––––––––0–––––––––––––––  <= right index f.                  
D ––0–––     ––––––0–––––––0–––––––0–––––––0–––  <= right thumb    
A ––––––     ––––––––––––––––––––––––––––––––––                       
E ––3–––     ––3–––––––3–––––––3–––––––3–––––––  <= right thumb    
    G          1 + 2 + 3 + 4 + 1 + 2 + 3 + 4 +

E ––––––     ––––––––––––––––––––––––––––––––––
B ––1–––     ––––––––1–––––––––––––––1–––––––––  <= right middle f.
G ––0–––     ––0–––––––––––––––0–––––––––––––––  <= right index f.
D ––2–––     ––––––2–––––––2–––––––2–––––––2–––  <= right thumb    
A ––––––     ––––––––––––––––––––––––––––––––––                     
E ––3–––     ––3–––––––3–––––––3–––––––3–––––––  <= right thumb    
    C          1 + 2 + 3 + 4 + 1 + 2 + 3 + 4 +

Add hammer-ons and you have Clay Pigeons

To wrap things up, let me show you one more change - and how this maps to what you’ll hear in John Prine’s version of Clay Pigeons (add capo 3rd fret to play along with him).

E ––––––     ––––––––––––––––––––––––––––––––––
B ––0–––     ––––––––0–––––––––0h1–––0–––––––––  <= right middle f.
G ––0–––     ––0–––––––––––––––––––––––––––––––  <= right index f.                  
D ––0–––     ––––––0–––––––0–––––––0–––––––0–––  <= right thumb    
A ––––––     ––––––––––––––––––––––––––––––––––                       
E ––3–––     ––3–––––––3–––––––3–––––––3–––––––  <= right thumb    
    G          1 + 2 + 3 + 4 + 1 + 2 + 3 + 4 +

E ––––––     ––––––––––––––––––––––––––––––––––
B ––1–––     ––––––––1–––––––––1h3–––1–––––––––  <= right middle f.
G ––0–––     ––0–––––––––––––––––––––––––––––––  <= right index f.
D ––2–––     ––––––2–––––––2–––––––2–––––––2–––  <= right thumb    
A ––––––     ––––––––––––––––––––––––––––––––––                     
E ––3–––     ––3–––––––3–––––––3–––––––3–––––––  <= right thumb    
    C          1 + 2 + 3 + 4 + 1 + 2 + 3 + 4 +

Here’s the D he plays - note the new note needed on the B string (1st fret) with your left hand. A bit tricky! But master it, and oh the fun.

E ––––––     ––––––––––––––––––––––––––––––––––
B ––1–––     ––––––––––––––––––0h1–––0–––––––––  
G ––2–––     ––––––––2–––––––––––––––––––2–––––  <= right index f.                   
D ––0–––     ––––––0–––––––0–––––––0–––––––0–––  <= right thumb    
A ––0–––     ––––––––––––––––––––––––––––––––––                     
E ––2–––     ––2–––––––2–––––––2–––––––2–––––––  <= right thumb    
    D          1 + 2 + 3 + 4 + 1 + 2 + 3 + 4 +

John Prine’s “Clay Pigeons” intro tab

Here’s the full tab of John Prine’s “Clay Pigeons” intro. Note, you’ll need a capo on the 3rd fret! You have a lot of sequence that repeat themselves here (e.g., the G and C measures) – it’s really the D sequence that changes between part 1 and part 2. See my video lesson for reference, and good luck!

Part 1 of 2:

Capo 3rd fret

E ||––––––––––––––––––––––––––––––––––|––––––––––––––––––––––––––––––––––|–
B ||––––––––0–––––––––0h1–––0–––––––––|––––––––1–––––––––1h3–––1–––––––––|–
G ||––0–––––––––––––––––––––––––––––––|––0–––––––––––––––––––––––––––––––|–
D ||––––––0–––––––0–––––––0–––––––0–––|––––––2–––––––2–––––––2–––––––2–––|–
A ||––––––––––––––––––––––––––––––––––|––––––––––––––––––––––––––––––––––|–
E ||––3–––––––3–––––––3–––––––3–––––––|––3–––––––3–––––––3–––––––3–––––––|–
      G                                  C                               
      1 + 2 + 3 + 4 + 1 + 2 + 3 + 4 +    1 + 2 + 3 + 4 + 1 + 2 + 3 + 4 +

E –|––––––––––––––––––––––––––––––––––|––––––––––––––––––––––––––––––––––|–
B –|––––––––0–––––––––0h1–––0–––––––––|––––––––––––––––––0h1–––0–––––––––|–
G –|––0–––––––––––––––––––––––––––––––|––––––––2–––––––––––––––––––2–––––|–
D –|––––––0–––––––0–––––––0–––––––0–––|––––––0–––––––0–––––––0–––––––0–––|–
A –|––––––––––––––––––––––––––––––––––|––––––––––––––––––––––––––––––––––|–
E –|––3–––––––3–––––––3–––––––3–––––––|––2–––––––2–––––––2–––––––2–––––––|–
      G                                  D                               
      1 + 2 + 3 + 4 + 1 + 2 + 3 + 4 +    1 + 2 + 3 + 4 + 1 + 2 + 3 + 4 +

Part 2 of 2:

E –|––––––––––––––––––––––––––––––––––|––––––––––––––––––––––––––––––––––|–
B –|––––––––0–––––––––0h1–––0–––––––––|––––––––1–––––––––1h3–––1–––––––––|–
G –|––0–––––––––––––––––––––––––––––––|––0–––––––––––––––––––––––––––––––|–
D –|––––––0–––––––0–––––––0–––––––0–––|––––––2–––––––2–––––––2–––––––2–––|–
A –|––––––––––––––––––––––––––––––––––|––––––––––––––––––––––––––––––––––|–
E –|––3–––––––3–––––––3–––––––3–––––––|––3–––––––3–––––––3–––––––3–––––––|–
      G                                  C                               
      1 + 2 + 3 + 4 + 1 + 2 + 3 + 4 +    1 + 2 + 3 + 4 + 1 + 2 + 3 + 4 +

E –|––––––––––––––––––––––––––––––––––|––––––––––––––––––3–––––––––––––––||
B –|––––––––0–––––––––––––––h1––––––––|––––––––0–––3–––––0–––––––––––––––||
G –|––0–––––––––––––––2–––––––––0–––––|––0–––––––––––––––––––––––––––––––||
D –|––––––0–––––––0–––––––0–––––––0–––|––––––0–––––––0–––––––0–––––––0–––||
A –|––––––––––––––––––––––––––––––––––|––––––––––––––––––––––––––––––––––||
E –|––3–––––––3–––––––2–––––––2–––––––|––3–––––––3–––––––3–––––––3–––––––||
      G               D                  G                               
      1 + 2 + 3 + 4 + 1 + 2 + 3 + 4 +    1 + 2 + 3 + 4 + 1 + 2 + 3 + 4 +

Good luck!

I hope this was helpful for you. As always, when chewing off bigger challenges for yourself - find ways to make them easy by breaking them into approachable steps.

Unlock My Secret Stash!

Gain instant access to my library of 196 print-friendly cheat sheets! Also includes my extended video lessons, jam tracks, courses, and more.

Join Song Notes Premium

Have questions? Watch video tour »

Browse Related Lessons

Click any tag below to view other lessons I've made in that category:

Enjoy my lessons? Buy me a beer!

If this and my other lessons have proven helpful to you, please consider making a one-time donation to my tip jar. Contributions of any amount help make this project possible (including the many, many hours I put into it).

Fun & Helpful Tools I've Made

Fret Monster

Interactive fretboard map! See the patterns behind every scale in any key.

View

Capo Captain

An easy way to calculate key & chord combinations, for any capo location!

View

Subscribe to my YouTube channel

Be sure to never miss a lesson by subscribing on YouTube. I put out 2-3 new videos every week. These include full song lessons, as well as covers, practice tips, behind-the-scenes updates. Thanks!


Recent Lessons

  • December 1, 2023

    First Steps with Doc Watson's "Deep River Blues"

    Here's a getting started guide to learning this fingerstyle classic from Doc Watson. I'll guide you, step-by-step, through the necessary chords, picking, and strumming skills needed.

  • November 22, 2023

    10 Years of Song Notes... Thanks to You!

    A few quick words of gratitude for all the support & encouragement you all have given me over the past ten years!

  • November 17, 2023

    Guitar Finger Exercises for Flexibility, Control, Speed, and more

    Here's a handful of my favorite exercises to help with finger independence. Whether you're a beginner or been at it for years, baking these into your practice routine can pay off big time!

  • November 10, 2023

    Lead Guitar Improvisation Tips (feat. Wagon Wheel)

    Learn how to improvise, step-by-step! I'll show how you can play countless riffs over a small cluster of notes on the thinnest three strings. Tons of fun!

  • November 5, 2023

    Travis Picking Training Wheels (ft. Hayes Carll)

    I showcase a short & fun fingerstyle riff, where I demonstrate the "training wheels" trick you can use to simplify any Travis Picking pattern.

  • November 4, 2023

    Strumming with Alternating Bass Notes

    Learn how to strum any of the most common chords using alternating bass notes – which is an essential technique often used in country, rock, and folk songs.

  • November 3, 2023

    Long Black Veil

    Learn to play Lefty Frizzell's 1959 country classic in the style of Johnny Cash! Includes alternating bass note strumming tips & a melody deep-dive.

  • October 28, 2023

    St James Infimary Blues

    A refresh for my 2019 lesson teaching this blues classic! I updated my PDF guide and added four new zoomed-in playthroughs, showing tabs on screen.

  • October 21, 2023

    Fingerstyle Patterns for All Chords (using Travis Picking)

    I've taught tons of lessons using Travis-style fingerpicking, but haven't ever put together a cheat sheet showing patterns for every common chord... until now!

  • October 16, 2023

    Soulful Lead Guitar Licks over "Amazing Grace"

    Learn how to combine simple strumming with beginner-friendly lead guitar licks while playing this classic song! Slow playthrough video & jam tracks included.

Browse All Recent Lessons →

Browse All My Lessons

By lesson type

By technique

By musical genre

By decade

By musical key

By popular artist


← back to homepage