The Circle of Fifths is an incredibly helpful way of visualizing all the major & minor chords in a circular diagram. It can likewise be used to visualize the 12 notes.
Of all the music theory charts & diagrams you may frequently reference, this is one of the most popular — since it’s helpful in so many ways.
First, a quick explanation of how this diagram works.
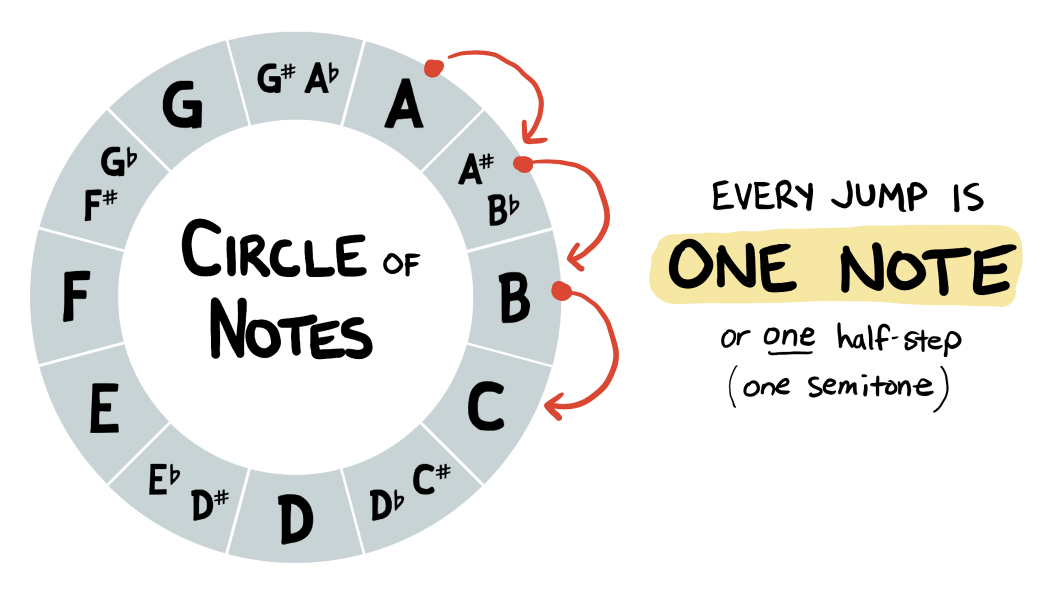
In a previous lesson, we looked at the Circle of 12 Notes, which visualizes the 12 chromatic pitches (notes) and how they can be shown in a circular format. As we move forward or backwards around the circle, we’re always moving one half-step (or one “note” or one “semitone”):
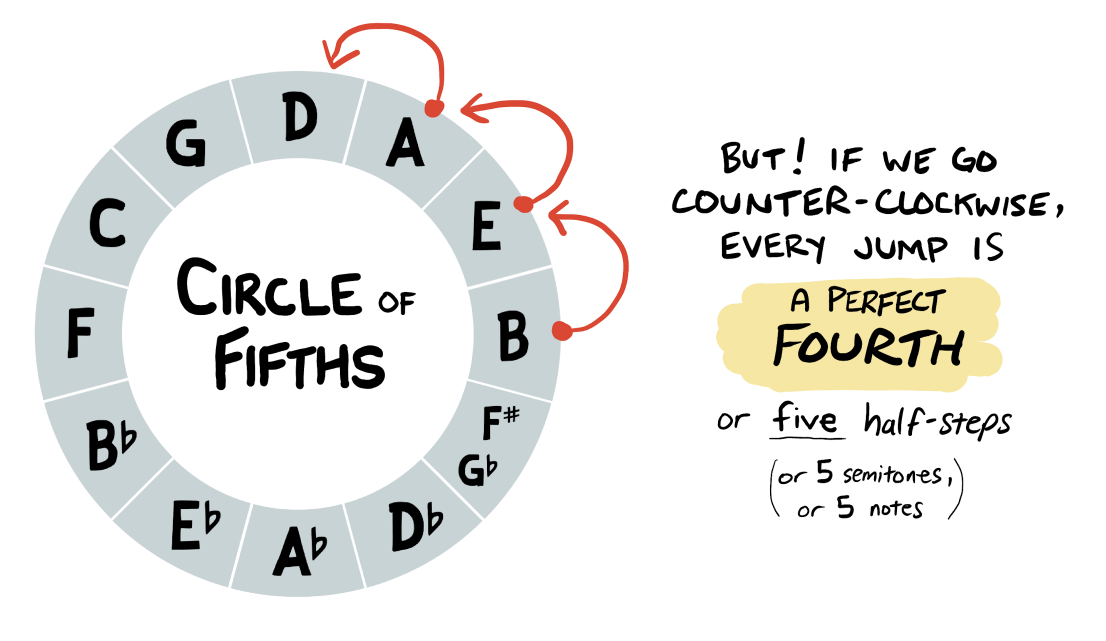
With the Circle of Fifths, we’ll using the same circular format. But as we move clockwise around the circle, each chord (or note) we move to is a perfect fifth (7 notes) away from the starting point:
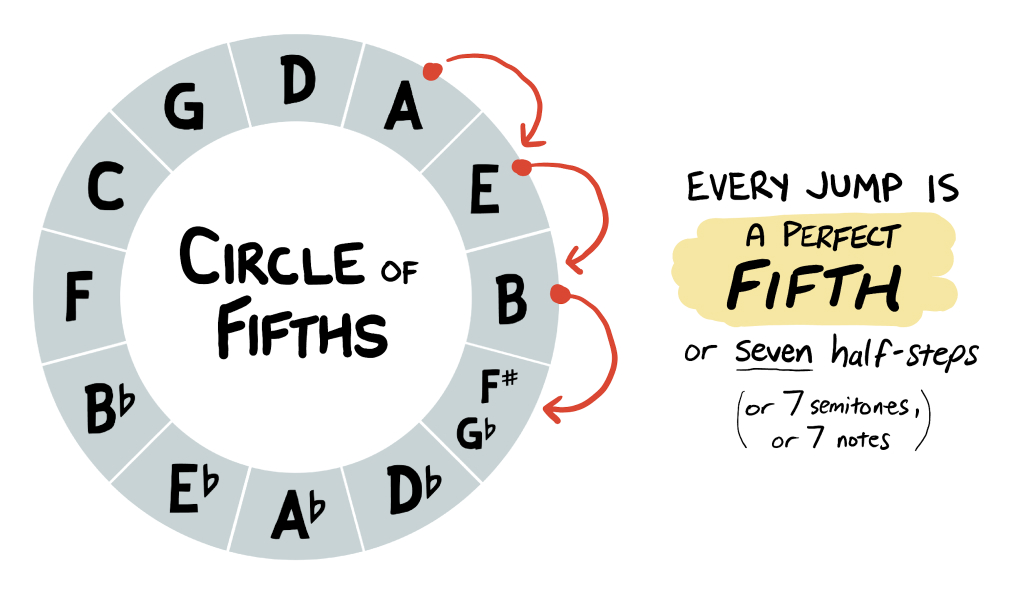
If we continue moving around the circle, we’ll eventually return to our starting note.
Note, this jump to the perfect fifth only works if we move clockwise. If we instead move counter-clockwise, we’ll jump a perfect fourth between each chord (or note):
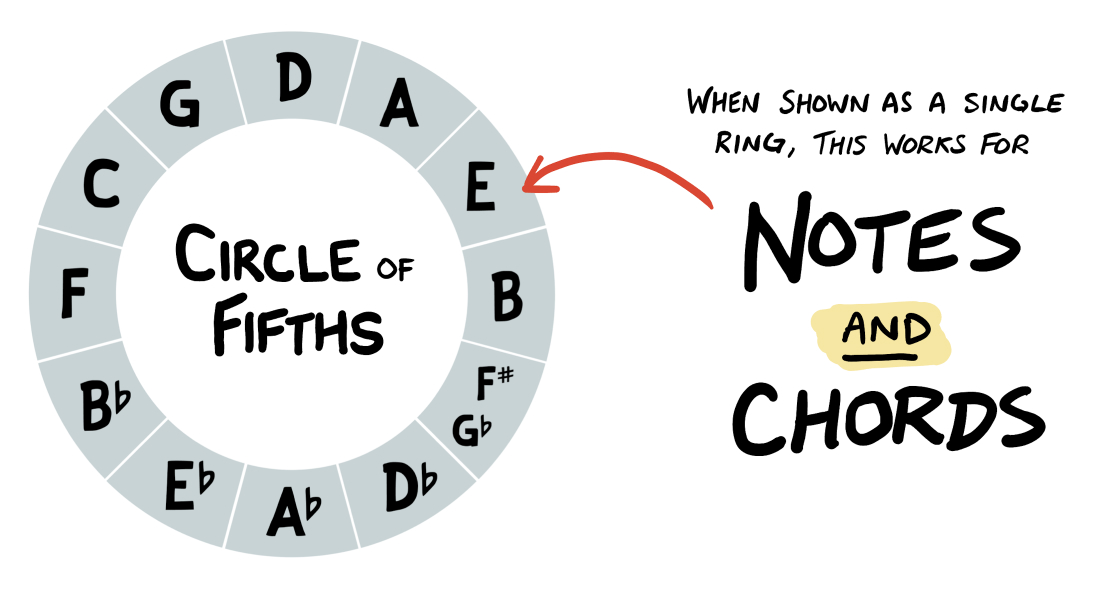
The diagrams above work for showing the 12 notes or the 12 major chords in a circular format, where each chord (as we move clockwise) is a perfect fifth away from its predecessor.
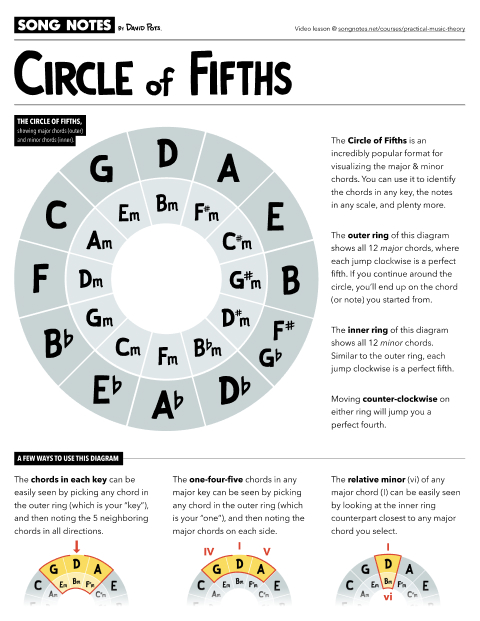
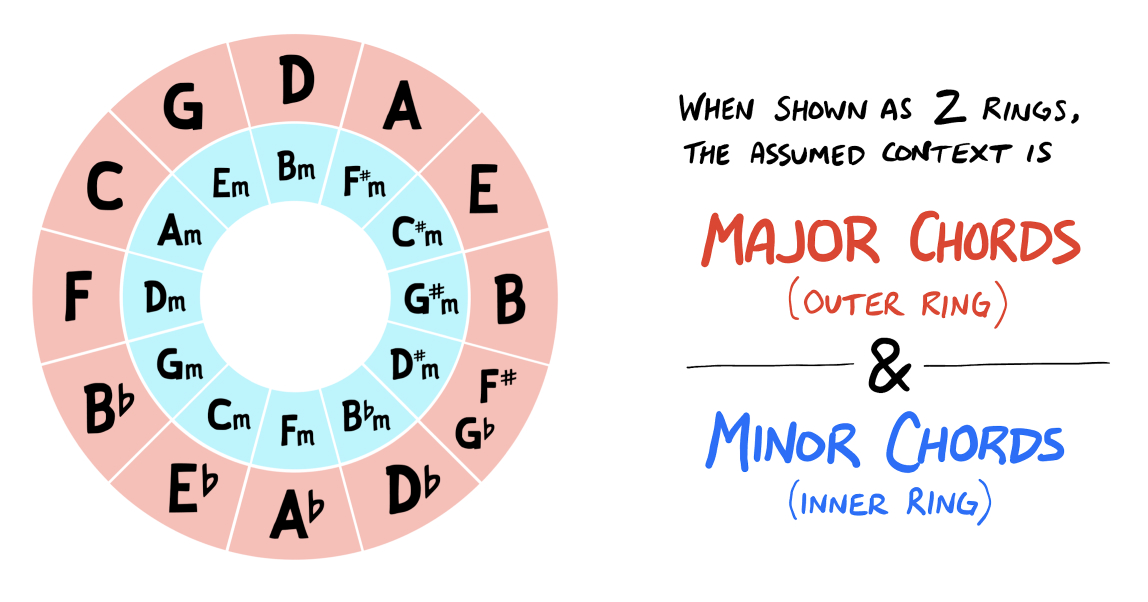
However, it’s very common to extend this diagram so there’s two rings. The outer ring shows all major chords, while the inner ring shows all minor chords:
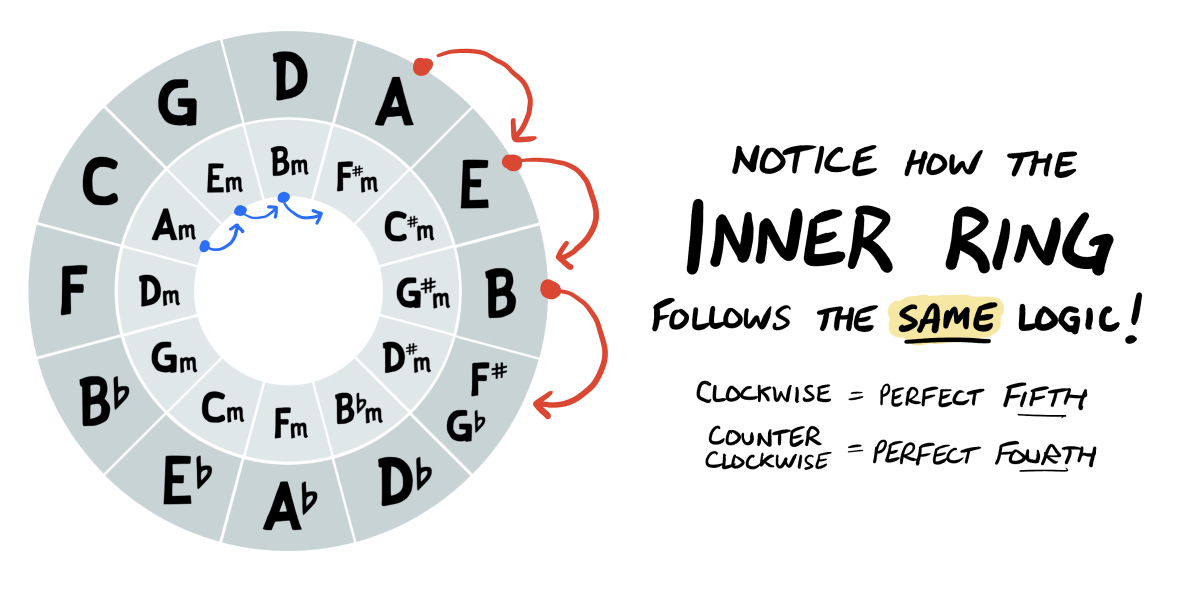
The chords in both rings follow the same logic (i.e. 7 notes separate each chord as we move clockwise):
This dual-ring diagram unlocks many possibilities, as far as the ways we can use the Circle of Fifths.
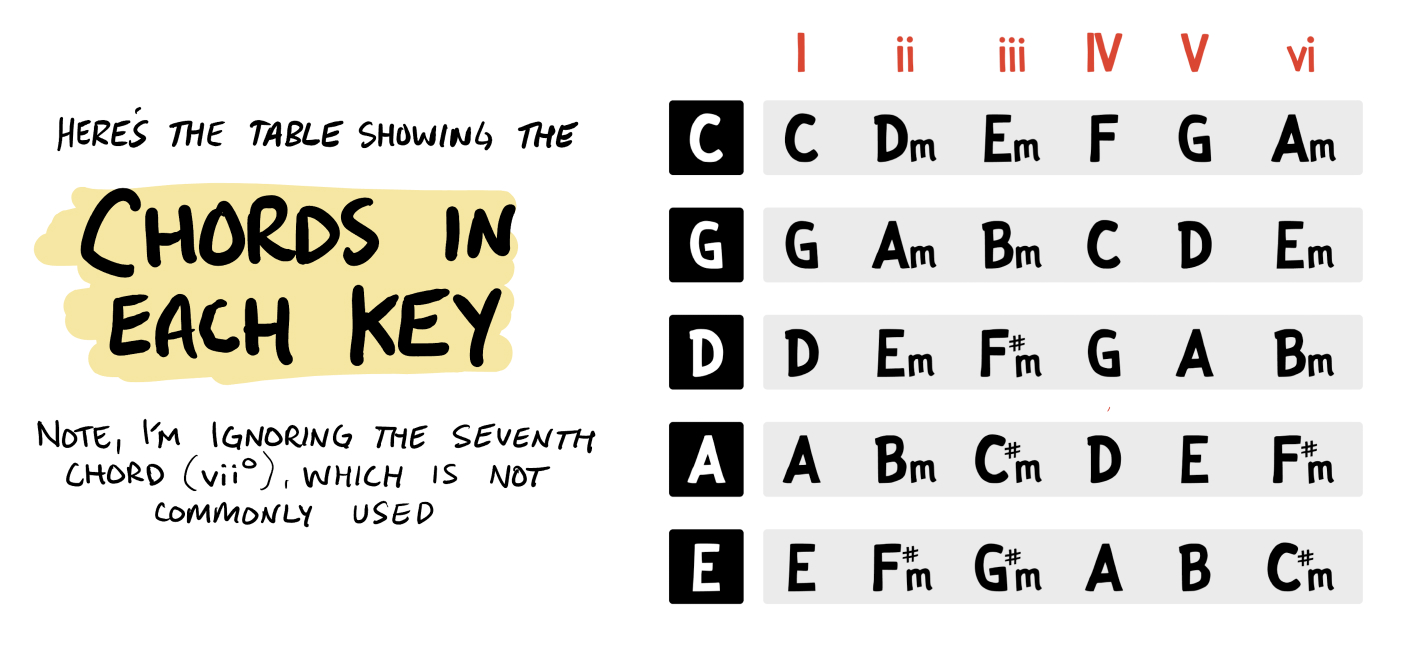
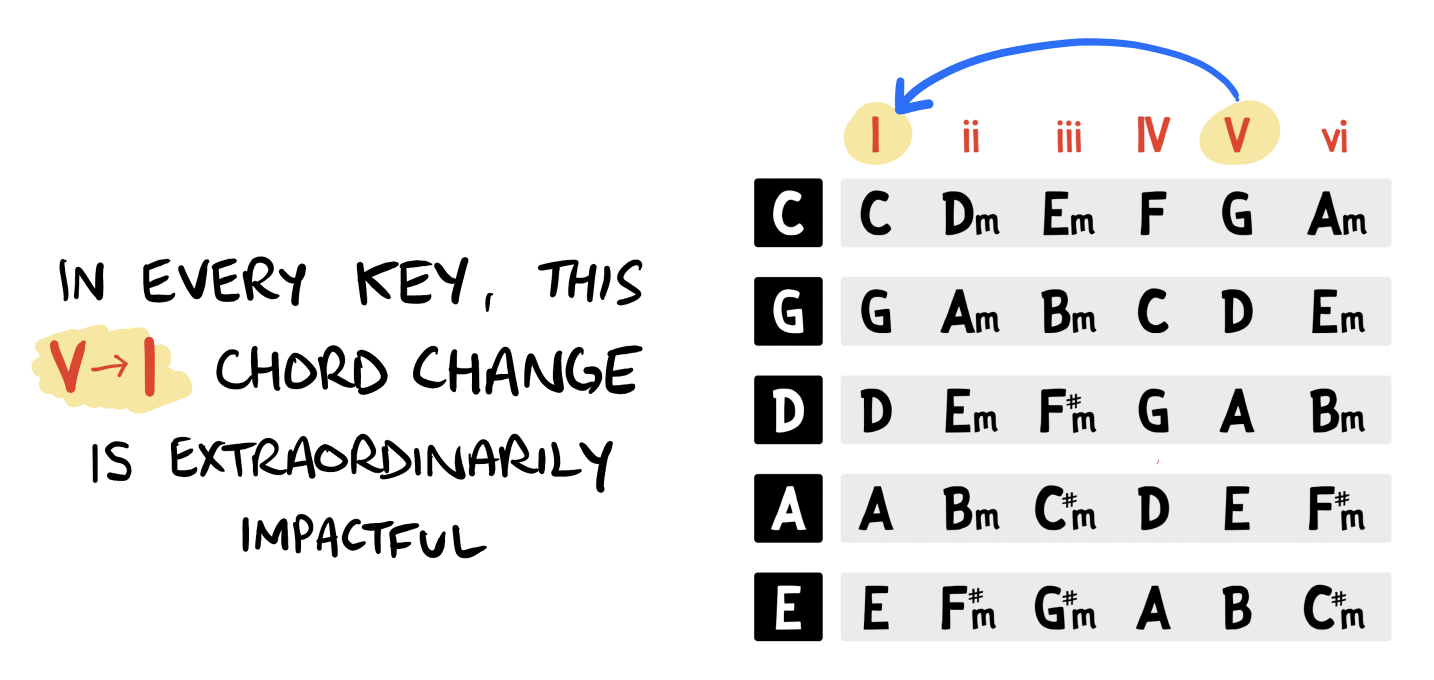
In a previous lesson, I explained The Chords in Each Major Key, and showed a helpful chart for you to use to visualize this information. For example, I showed you this table that illustrates the chords-in-key for the five most common keys (on guitar):
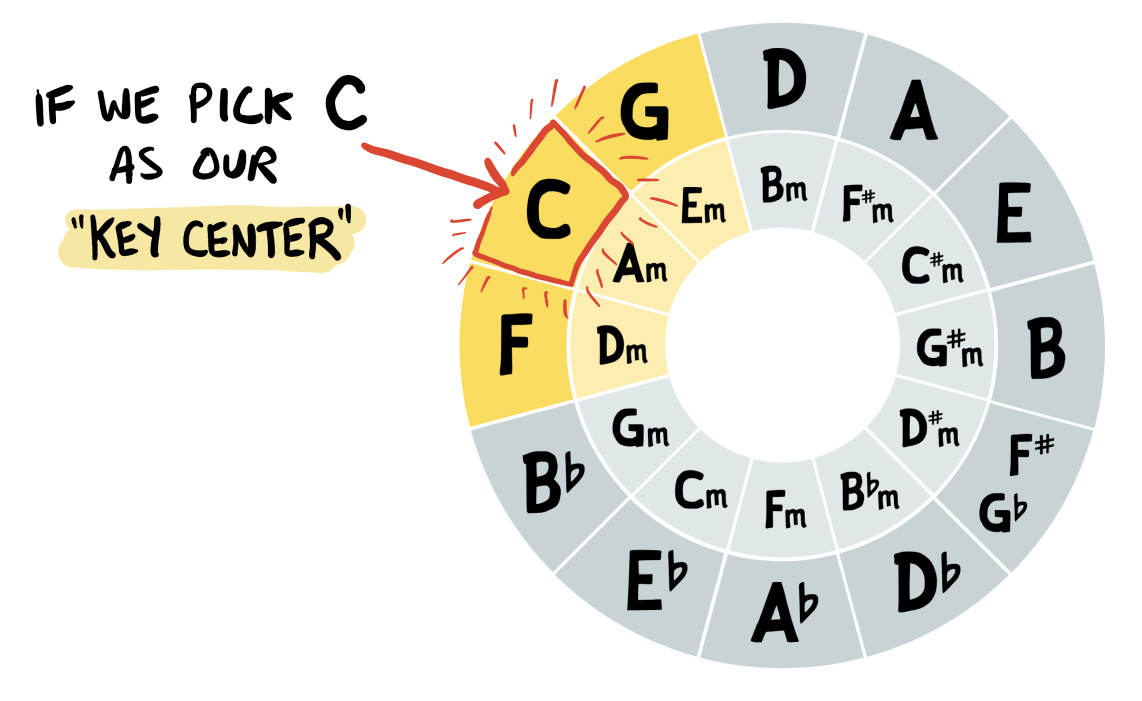
We can do the same thing with the Circle of Fifths in a way that’s far more efficient. All we need to do is pick out any of the outer-ring major chords as our starting point. This will represent our “tonic” — or in plain terms, the chord we’re in the key of.
For example, let’s pick the C chord. This becomes our “tonic”… meaning, we’ll be in the Key of C major:
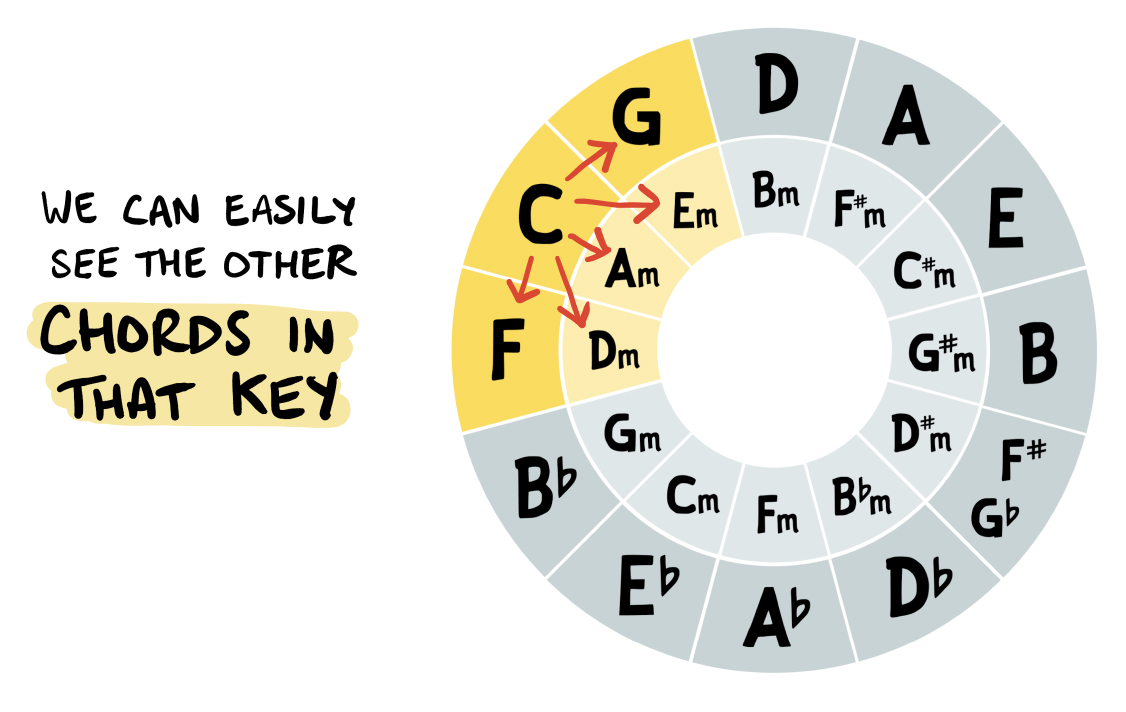
If we look at the five chords that surround this starting chord (using both the outer & inner ring), we can immediately see the 6 “main” chords within that key. These are the chords built upon the first 6 notes in that key’s major scale:
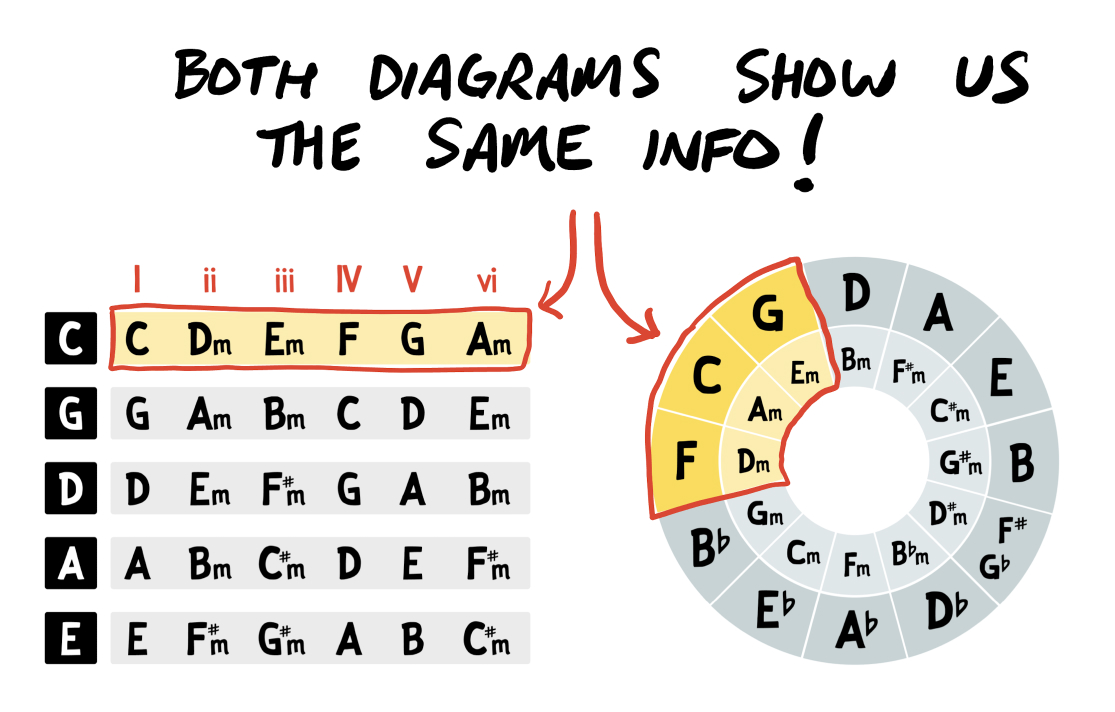
Notice how, when shown next to the table of chords-in-each-key, you can see there’s an exact match of these first six chords in the Key of C major (C, Dm, Em, F, and G):
Likewise, we can jump to the key of A major, and easily view the 6 chords of A, Bm, C#m, D, E, and F#m:

Or we can jump to the key of D major, and view the 6 chords of D, Em, F#m, G, A, and Bm:
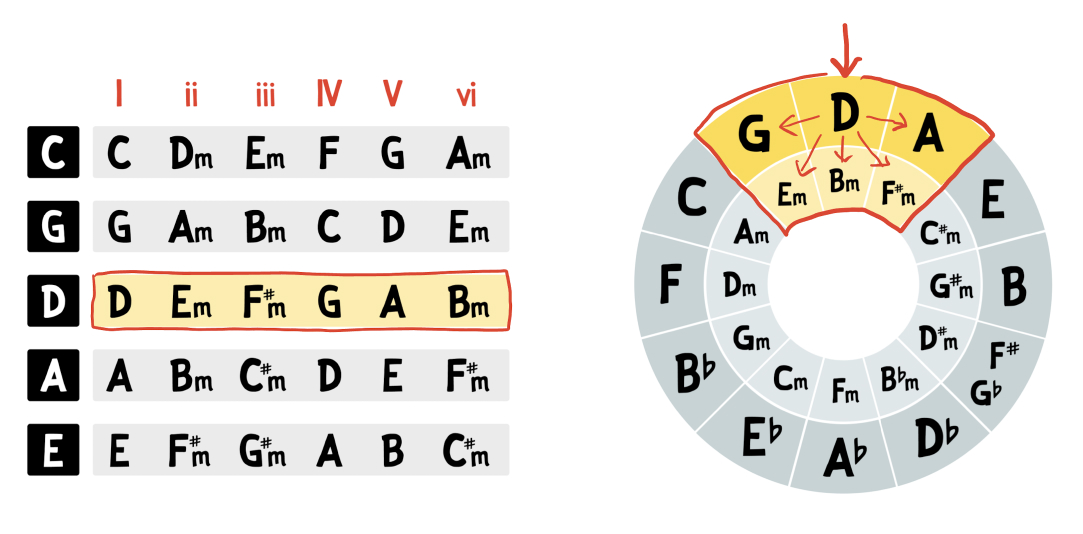
This works for all 12 major keys! Simply pick the starting point on the outside circle (which becomes your tonic), and you can immediately see all 6 chords within that major key. The surrounding chords always follow this numbering sequence, if you’re curious:
To see how this is true for all 12 keys, compare the Circle of Fifths diagram against the chart showing the chords in each key:
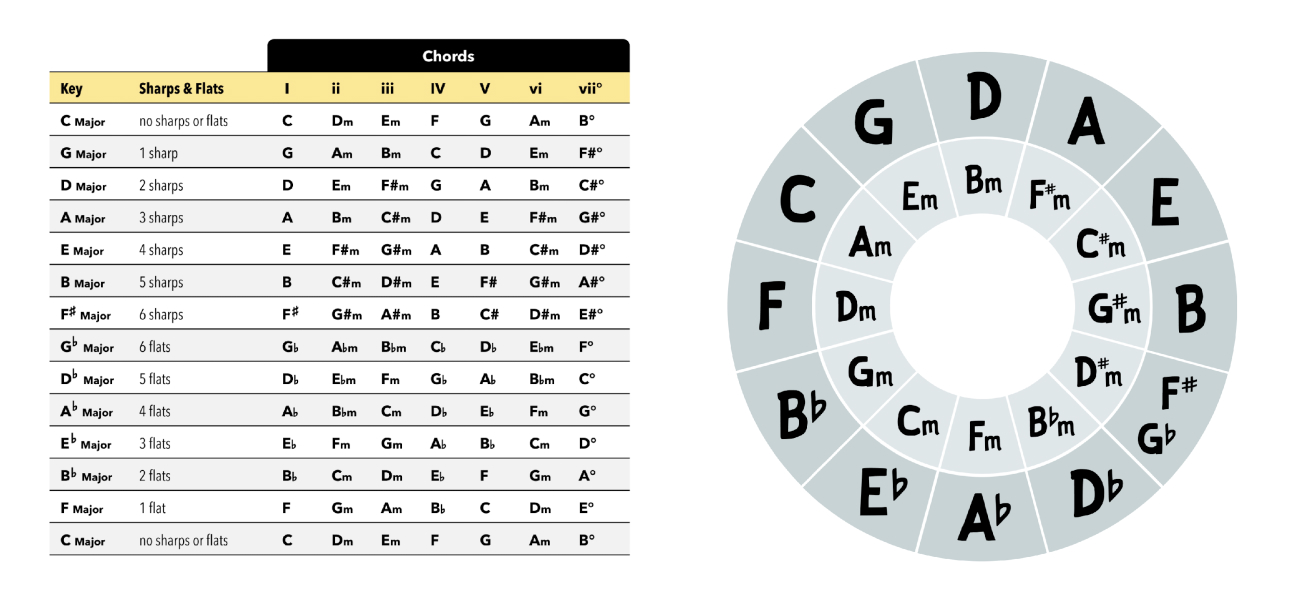
All that’s missing is the chord seven chord (labeled as “vii°” in Roman numerals) — which is the diminished chord in that major key. But this is okay — because as I said in the previous lesson on this topic, diminished chords are incredibly rare in popular music.
For a simpler example that uses the same concept, let’s look at the most common 3 chords in any key: the one (I), four (IV), and five (V). No matter which chord you use as your starting point, you can play countless classic songs using these three chords alone.
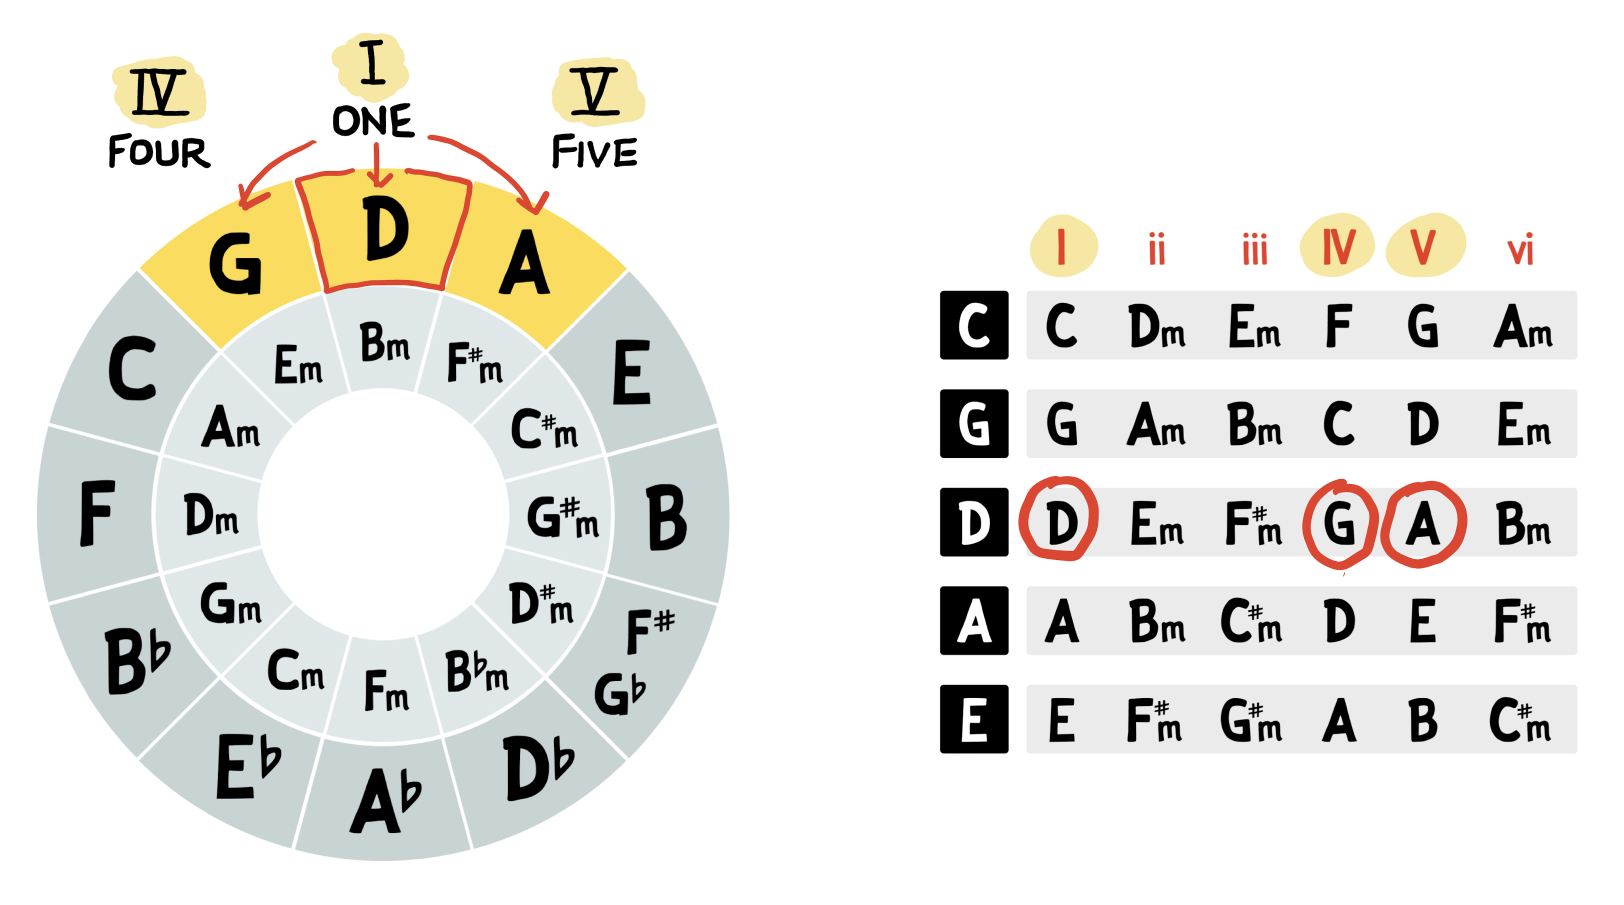
We only need to pick a starting point on the outer ring, which becomes our key center (or tonic, or “one” chord). From here, we can always find the “five” (dominant) chord by moving one chord to the right. Likewise, the “four” (subdominant) chord will always be one chord to the left.
For example, if we’re in the Key of D major, we can easily see that the “five” chord is A, and the “four” chord is G:
Alternatively, if we’re in the Key of E major, we can easily see that the “five” chord is B, and the “four” chord is A:
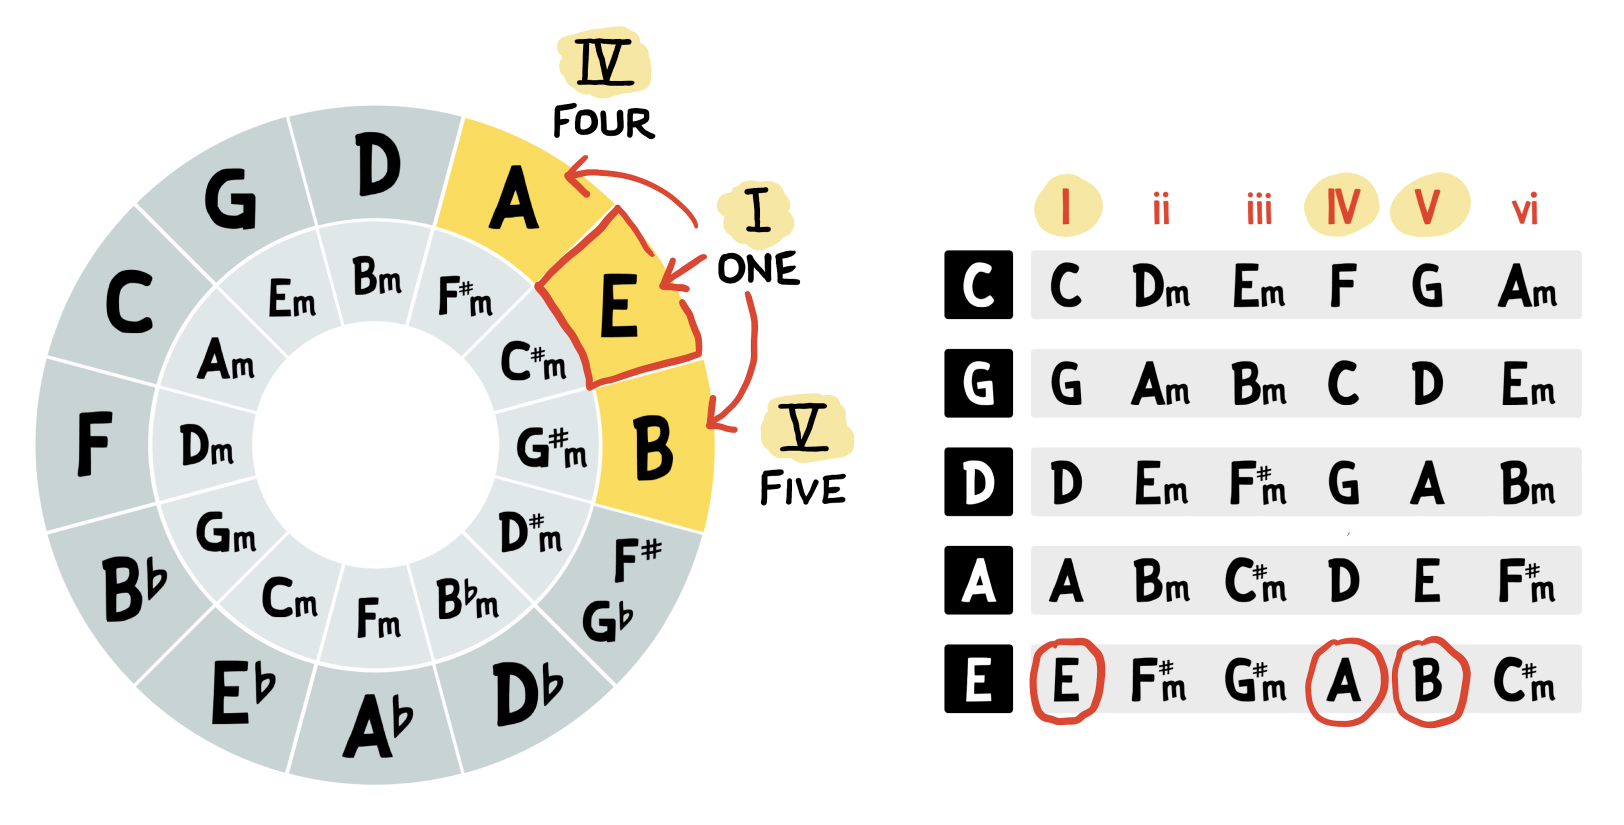
Again, this works no matter where you are on the fretboard.
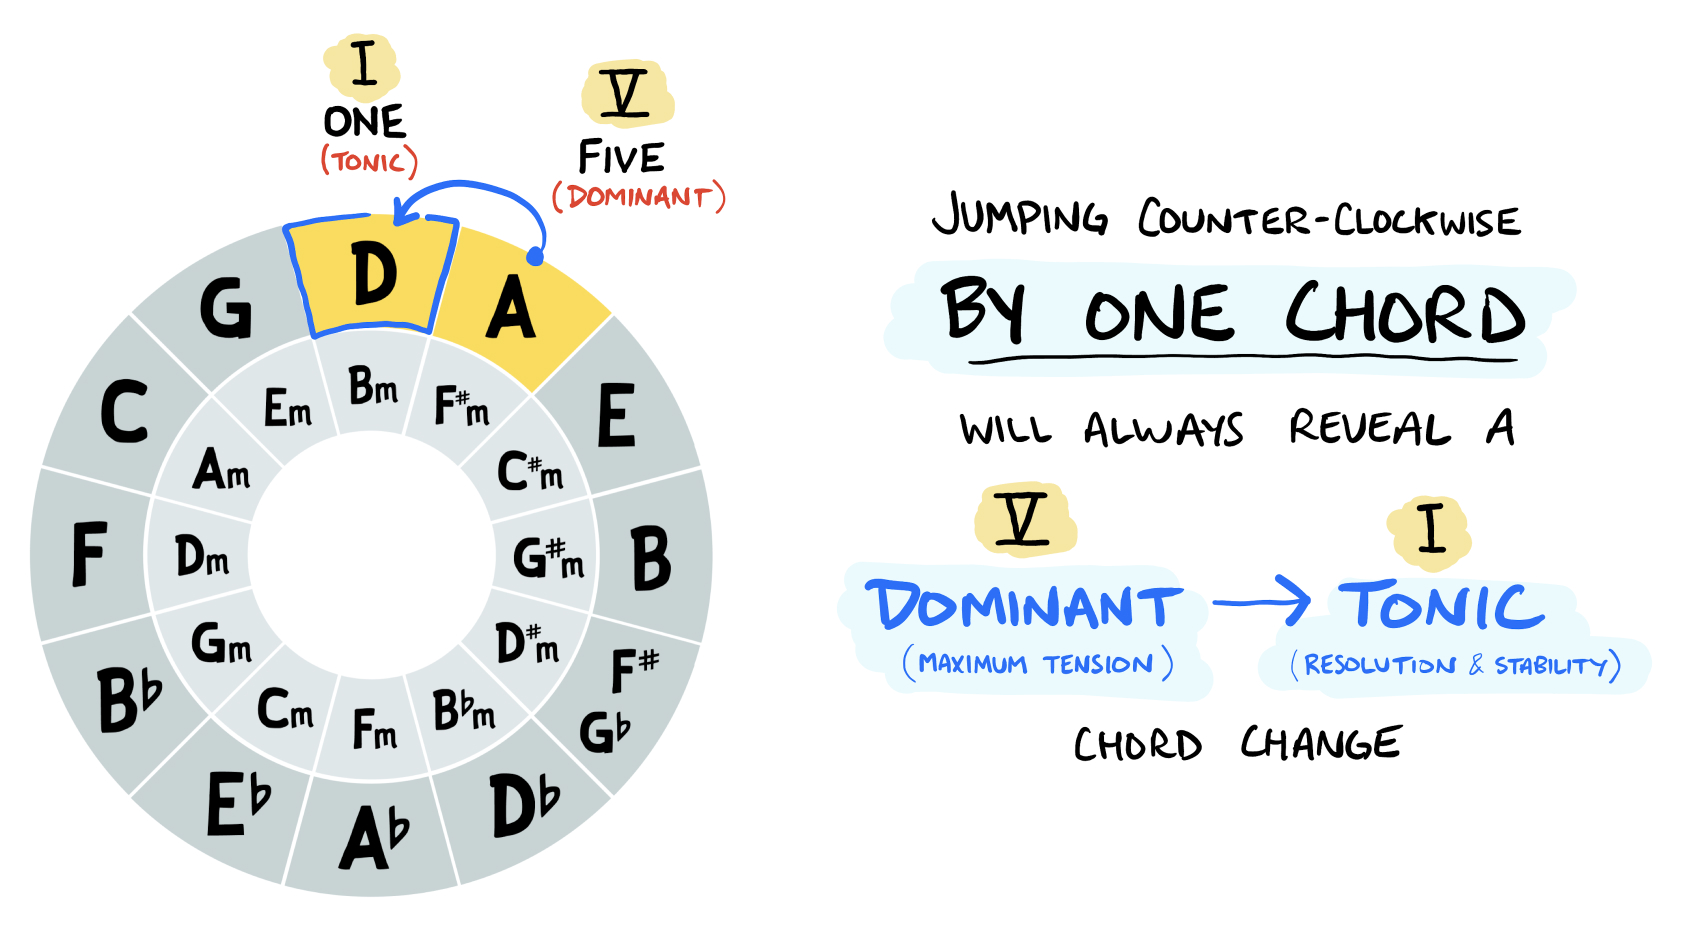
Looking at the chords within any key, there’s a single dominant chord (or “five” chord) — which will always sound pleasing when it transitions back to the tonic (or “one”). This is generally considered the most functionally impactful of all chord transitions:
On the Circle of Fifths, this is visualized by moving a single step counter-clockwise. For example, A is the dominant chord in the key of D:
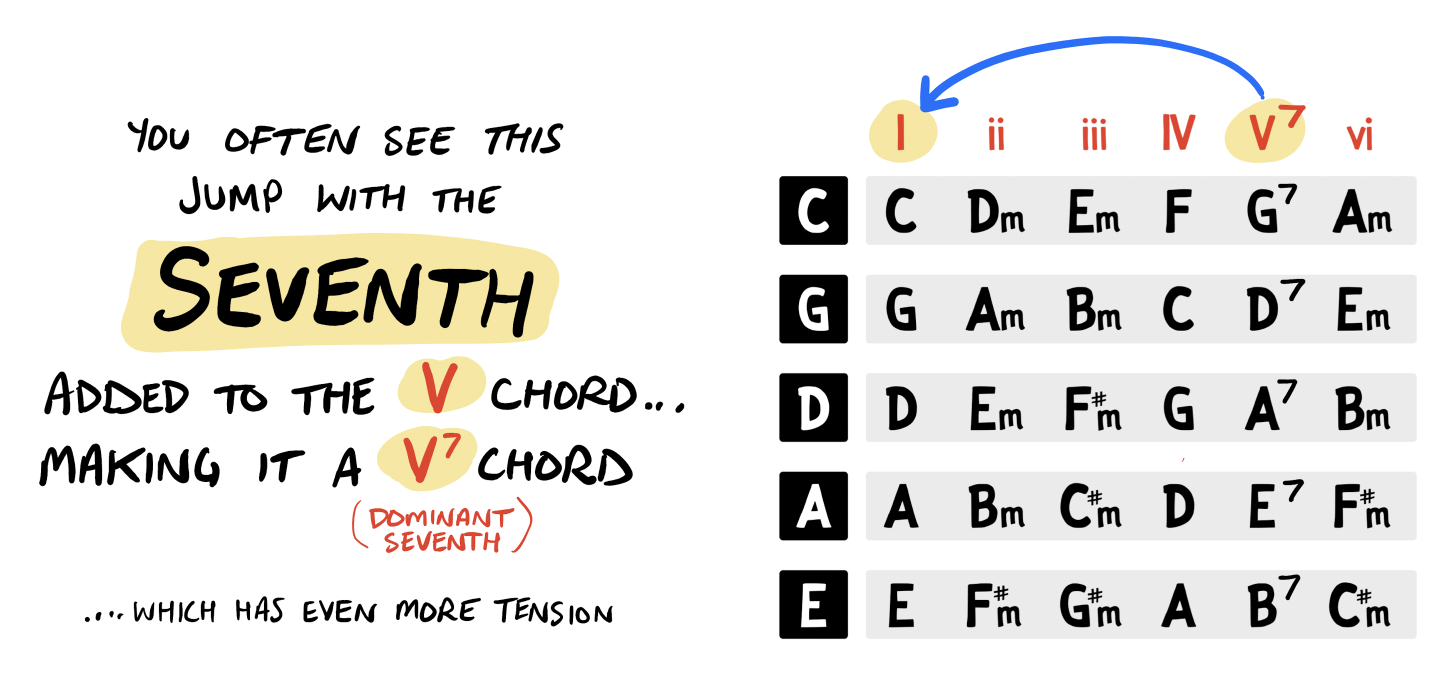
You may often seen this dominant chord played with an added seventh — i.e. a dominant seventh, or V7 chord. This accentuates the tension, making the pay-off & relief that much more satisfying:
This is yet another way you can quickly & easily use the Circle of Fifths.
This one is a slightly more advanced topic, but hang with me for a moment.
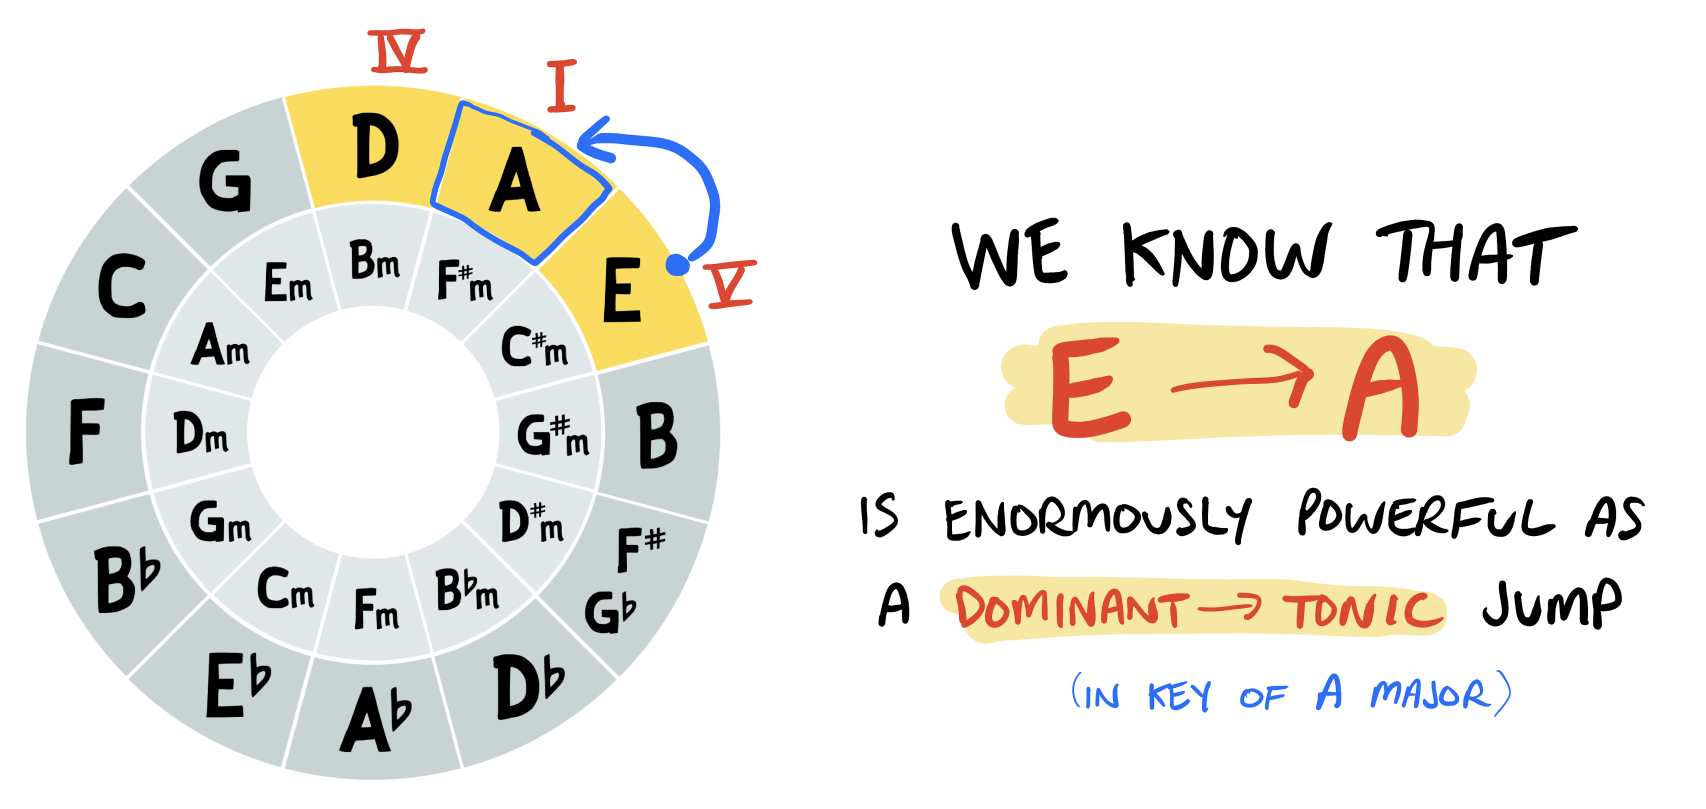
Sometimes you’ll notice a song includes chords that typically are not found in that major key’s group of common chords. Most of the time, this is what we call a secondary dominant — where the rogue chord is itself the dominant (five or “V”) relative to the chord it’s about to switch to.
For example, we know that jumping from E to A is a dominant to tonic transition (in the Key of A major). The dominant chord introduces tension, which is resolved when we transition to the tonic:
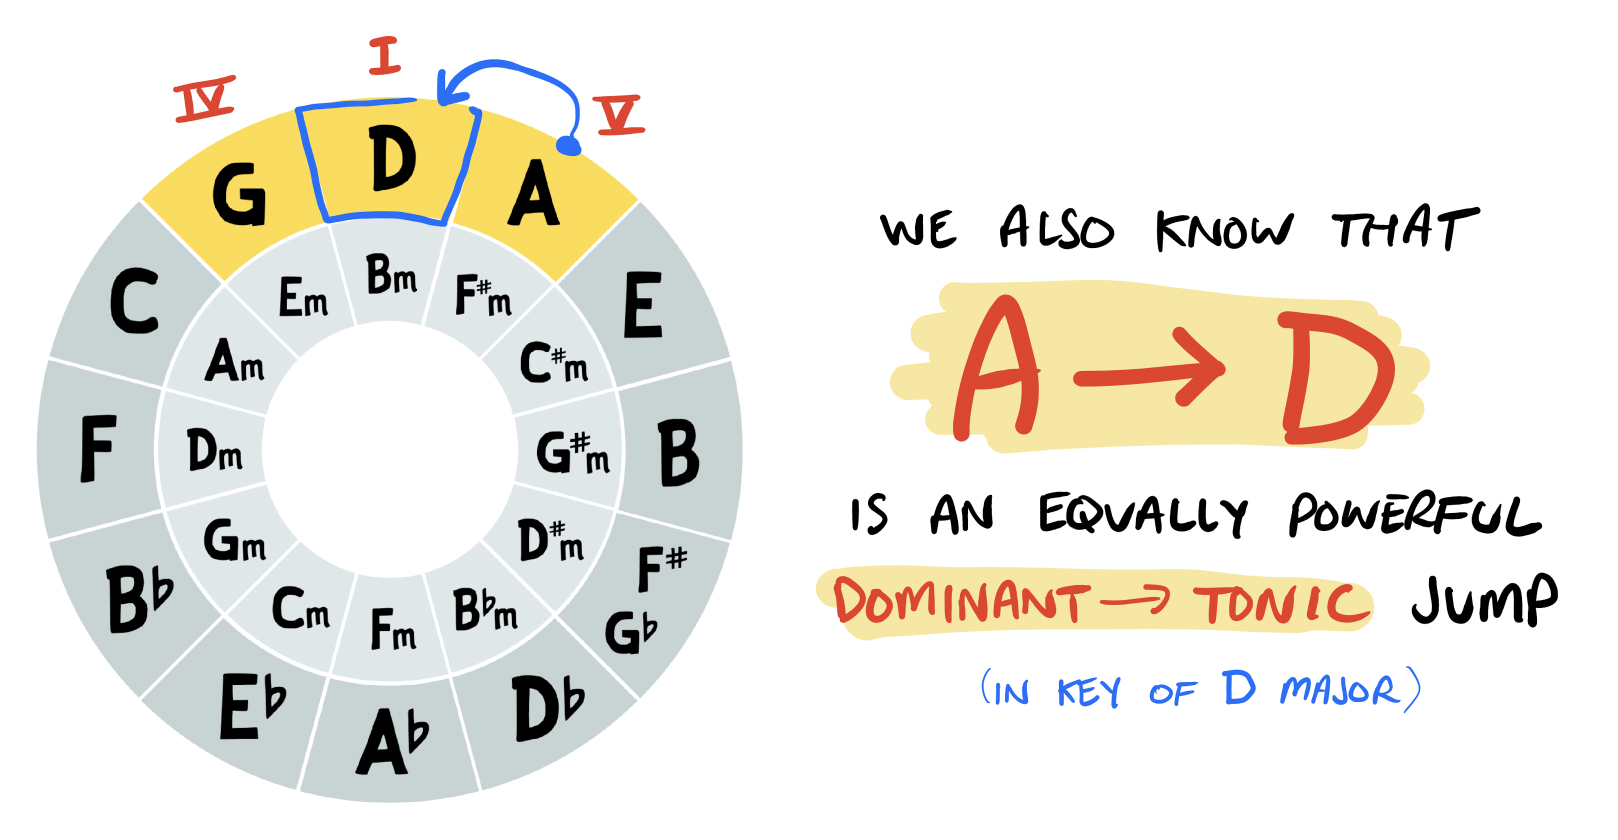
We also know that jumping from A to D is likewise a dominant to tonic transition… this time in the Key of D major. Again, the dominant chord introduces tension, which is resolved when we transition to the tonic:
Very frequently, we’ll see these two jumps above combined into a single chord progression. Specifically, when we’re in the Key of D we might occasionally see a jump from E to A to D. You may also see this written as E7 to A7 to D — which is the same concept:
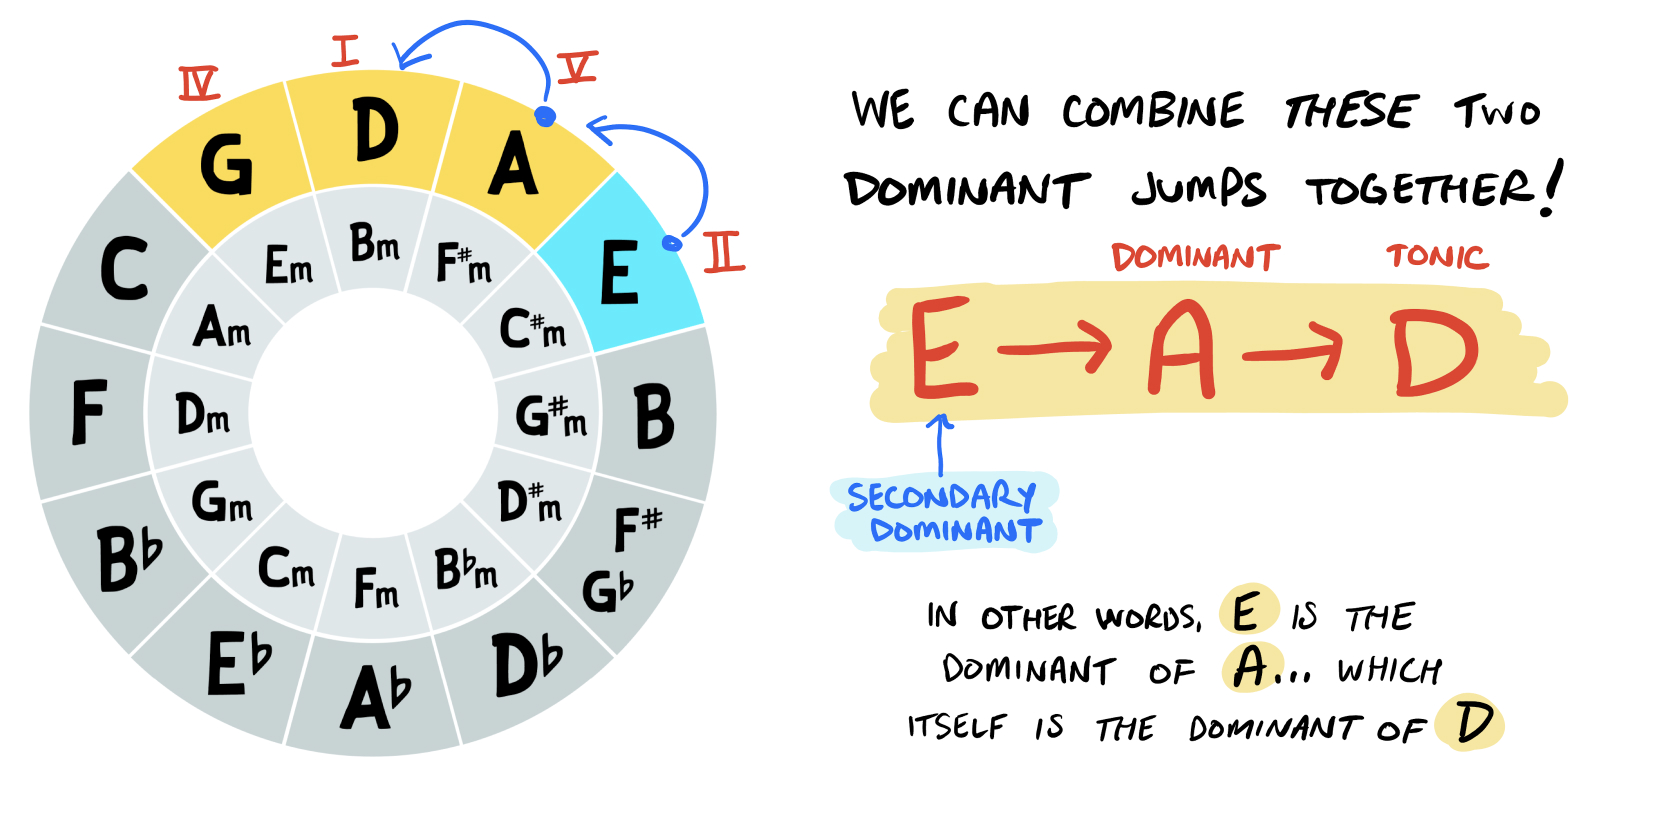
In this case, the chord E is not in the Key of D major… but it’s used here as a secondary dominant. Meaning, E is the dominant in some other key. Whenever you see chords that aren’t typically used in a given key, this is often what’s happening!
Again, we’ll tackle this in a separate lesson — but I wanted to share it here because the Circle of Fifths makes secondary dominants incredibly easy to see.
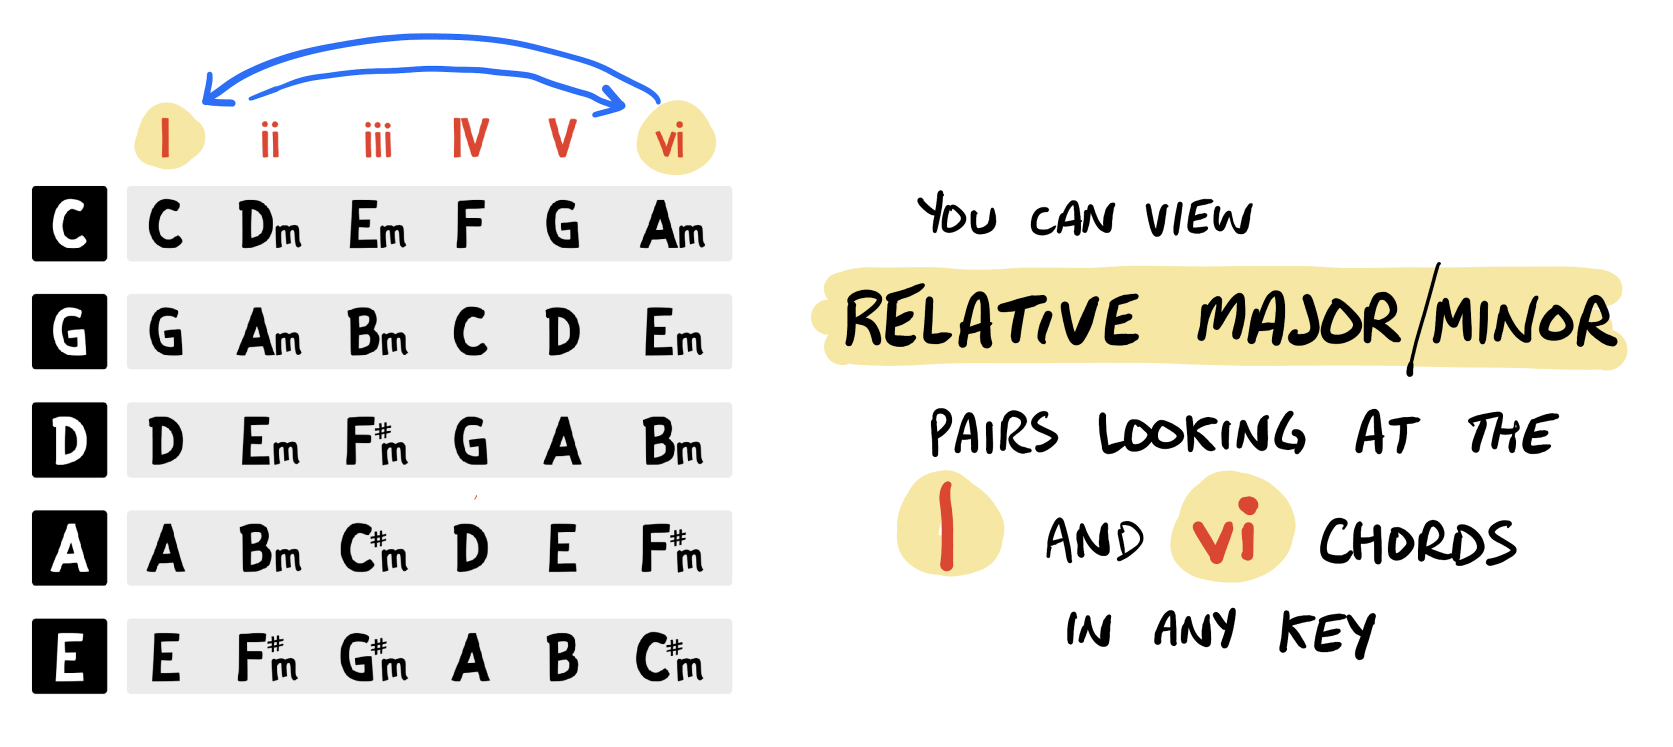
Another concept we’ll tackle later is that of “relative minors” and “relative majors”. Typically, you can spot the relative major & minor relationship by looking at the I and vi chords, in any major key:
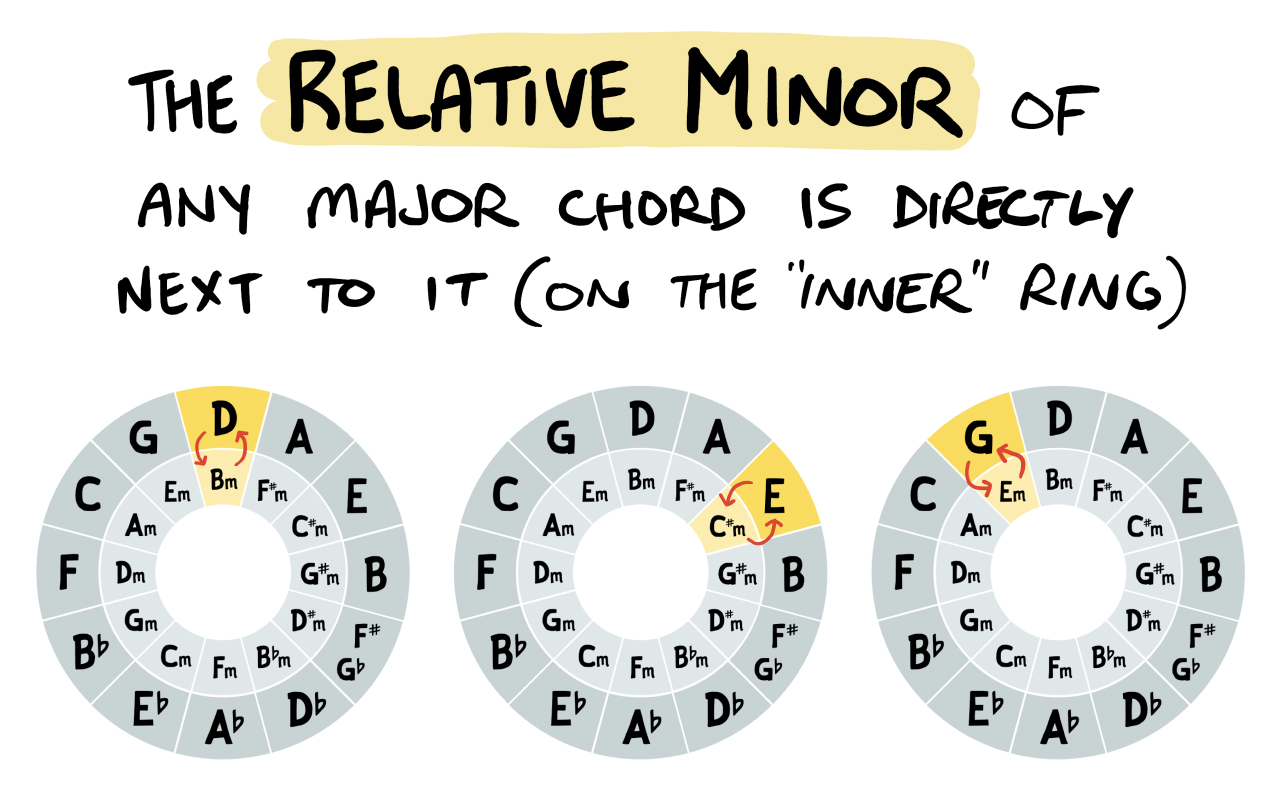
This relationship is incredibly easy to see on the Circle of Fifths. Simply take any major chord (outer ring) and move to the matching minor chord on the inner ring… that’s the relative minor!
Regarding relative minor chords, they share two of the notes found in their relative major counter-part. This makes them sound incredibly similar.
Note that this relative minor concept also pertains to the minor scale and minor keys. For example, the A-minor scale has the same notes in it as the C-major scale. And, the chords in the key of A-minor are the same as the chords found in the key of C-major.
More on this topic in future lessons!
You might notice that my Circle of Fifths diagrams shows some chords as having only sharps (e.g. F#, C#m) — and others has having only flats (e.g. Eb, Bb, etc). Why am I picking one over the other? “Don’t worry too much about it” is my short answer. “I’m keeping it simple” is another.
For a slightly longer answer, look back at my table showing the chords in each key:
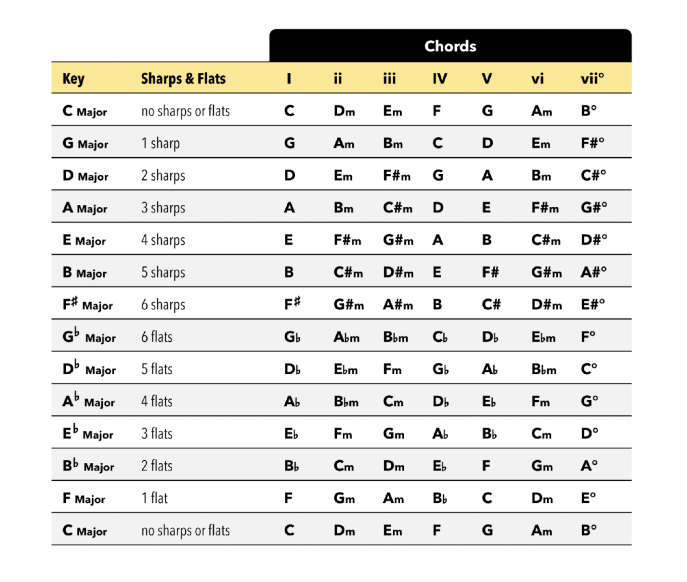
Look carefully at each key, paying attention to when I use sharps or flats. You’ll notice the convention is to:
This is done because of the rule or convention of “using the letters A-G exactly once in each major scale” — sharps and flats notwithstanding. To ensure this convention is followed, some keys have flats while others have sharps. I’m simply following that logic.
The only exceptions are the Key of F# and Key of Gb, both of which include the same notes. And due to coincidental logic with the musical alphabet, using either sharps or flats work for those two keys. So — for that note/chord only, I’m showing both F# and Gb together in my Circle of Fifths diagram.
But again, don’t sweat aspect of things! It’s very much an editorial decision on my part. You’ll notice different visualizations of the Circle of Fifths have to take a stance on how to handle sharps and flats, and ultimately I want to keep things simple.
To cement this concept, I recommending downloading my attached cheat sheet, printing it out, and keeping it somewhere handy.
Look at it from time to time, especially as you’re learning new songs or playing out familiar chord progressions. In my experience, you’ll start to notice these connections within this diagram, and many of these concepts will cement themselves.